Experience Interoperability and L2 Scalability
Milkomeda delivers rollup technologies to leading Layer 1 ecosystems by offering the most popular smart contracting language, Solidity, while enhancing inter-blockchain interoperability, user experience, and developer traction all at the Layer 2 level.

News
Go Prev
Go Next

Select what defines you best
What is Milkomeda?
Milkomeda allows Apps to work in multiple blockchains. Image if any cool Android App could work in your iPhone without any changes!

DeFi
Stablecoins, DEXes, Money Markets, DeFi 2.0, etc.
Bridges
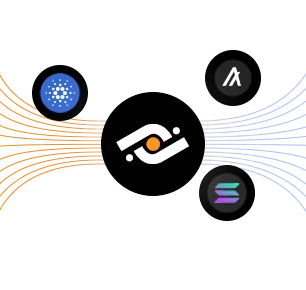
Connecting Algorand, Solana and Cardano.
Games
Play to Earn and other Blockchain based games.

NFTs
NFT platform support, unlocking the power of NFTs
How to connect
Getting Started
The Milkomeda C1 sidechain uses MilkADA as its base asset for paying fees and gas. To access the sidechain, you will need a Cardano wallet with some ADA as well as the MetaMask browser extension.
On the following pages we will walk through the steps to create a Cardano wallet in Flint, configure MetaMask to get a Milkomeda C1 address, and finally send ADA to be converted into MilkADA on Milkomeda C1.
Our first step is to install Flint Wallet. Proceed to the next section to begin.
We have a suite of webpages and tools to help navigating Milkomeda:
Getting a Cardano Wallet (Flint)
Flint Wallet is a Chrome extension that serves as a convenient go-to light wallet for DeFi and NFTs. The current version of Flint allows users to enable "Milkomeda mode" to send transactions to the Milkomeda C1 sidechain. Install Flint Wallet by visiting the following link while using Chrome browser and clicking the “Add to Chrome” button: Install Flint Wallet
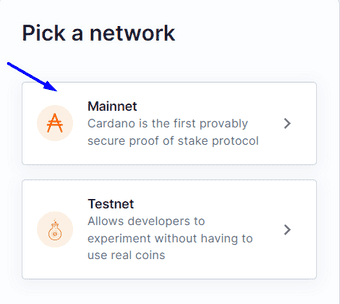
After installing, click the "puzzle piece" icon ![]() at the top right of the Chrome window to access your extensions. Select Flint. Within the Flint Wallet window, proceed past the initial warning screen, click “Let’s Begin”, choose your language, click “I agree”, and when you arrive at the screen shown below, click the “Mainnet” button.
at the top right of the Chrome window to access your extensions. Select Flint. Within the Flint Wallet window, proceed past the initial warning screen, click “Let’s Begin”, choose your language, click “I agree”, and when you arrive at the screen shown below, click the “Mainnet” button.
Next, click “Confirm”, “Create a new wallet”, and write down a copy of your recovery phrase.
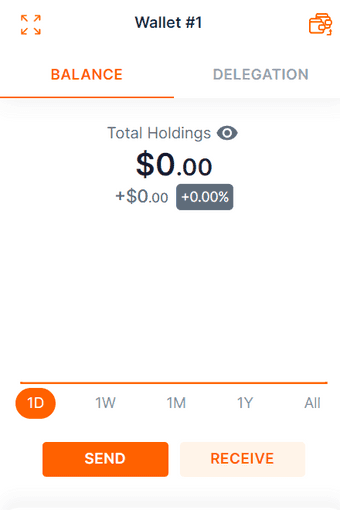
Confirm the recovery phrase at the next screen, set a wallet password, and click “Create my wallet”. For now you can select “Skip” at the App Passcode screen, and then click “Finish”. You should now have a Cardano wallet, as shown:
Note that to proceed further you will need to fund your wallet with some ADA. Refer to the "Get Help" section at the end of this document if you require assistance or encounter trouble at this stage.
Next, we will configure MetaMask to connect to the Milkomeda C1 sidechain.
Get and Setup a Milkomeda Wallet (Metamask)
The next step is to obtain an address on the Milkomeda C1 sidechain where we can receive our MilkADA. For now, we recommend using MetaMask for this step.
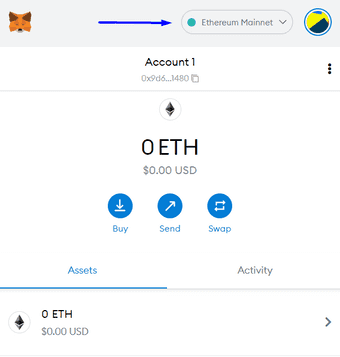
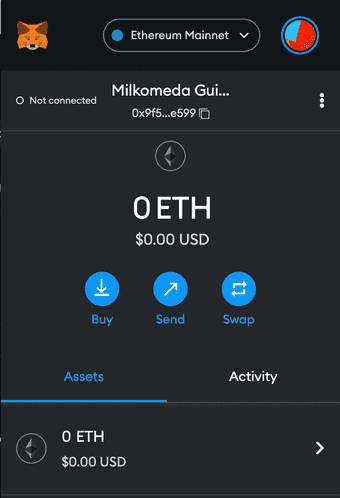
First, install MetaMask for Chrome. Then, click the Chrome Extensions icon ![]() and select MetaMask. Within the MetaMask window, click "Get Started" and then "Create a Wallet". Set a wallet password and click through the rest of the setup screens. When finished, you should have a new empty wallet as shown below. Select the network dropdown at the top right of the MetaMask screen.
and select MetaMask. Within the MetaMask window, click "Get Started" and then "Create a Wallet". Set a wallet password and click through the rest of the setup screens. When finished, you should have a new empty wallet as shown below. Select the network dropdown at the top right of the MetaMask screen.
From the dropdown list, select “Add Network” and enter the following:
Network Name: Milkomeda Cardano (C1)
New RPC URL: https://rpc-mainnet-cardano-evm.c1.milkomeda.com;
Chain ID: 2001
Currency Symbol (Optional): MilkADA
Block Explorer URL (Optional): https://explorer-mainnet-cardano-evm.c1.milkomeda.com
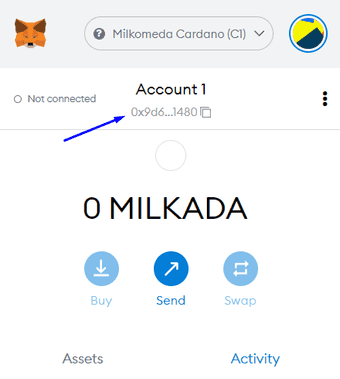
Click “Save”, and you should now see "Milkomeda Cardano (C1)" in the network dropdown. Copy your C1 wallet address to the clipboard by clicking on the account name, as shown.
Now we are ready to return to Flint Wallet and send our ADA to be converted to MilkADA.
Moving Assets to Milkomeda C1 (Wrapping)
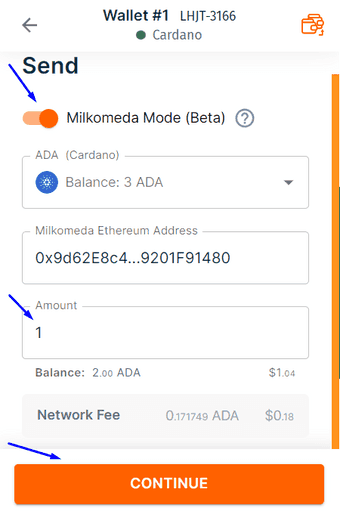
Open the Flint Wallet window and click "Send". At the next screen, enable the "Milkomeda mode" toggle, paste the Milkomeda C1 wallet address currently in the clipboard into the "Milkomeda Ethereum Address" field, and enter the amount to send (1 ADA in this example). Then click "Continue".
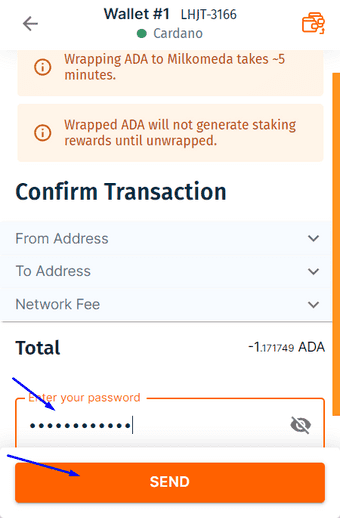
At the confirmation screen, enter your wallet password and click "Send".
The transfer will require 10 confirmations, which should take approximately 5 minutes. Once the transaction is confirmed, the transferred MilkADA should be visible in your C1 wallet in MetaMask.
A note on transaction fees
For transactions that take place solely on the Milkomeda C1 sidechain, you only pay the standard Milkomeda network transaction fee set by the block producers.
However, transactions that involve wrapping, i.e., moving assets between Cardano and the Milkomeda C1 sidechain, require payment of transactions fees for both Cardano and Milkomeda since one transaction is required on each chain.
For example, sending assets from Cardano to Milkomeda C1 requires one transaction on Cardano to lock your assets and another transaction on Milkomeda C1 to issue the wrapped assets to you.
When sending a transaction of this type in Flint Wallet, you can expand the "Network Fee" item to see a "Base Fee" (i.e., the Cardano transaction fee) and a "Milkomeda Fee". Note that the "Milkomeda Fee" for these transactions will be slightly higher than the standard transaction fee on Milkomeda since you are also paying the block producers for their role in wrapping your assets.
Now you have successfully wrapped your ADA into MilkADA for use on the Milkomeda C1 sidechain.
About "MilkADA" vs. "Wrapped ADA"
MilkADA is the base asset on the Milkomeda C1 sidechain. When you move ADA to Milkomeda, you receive MilkADA.
Apart from MilkADA, there is another token called "Wrapped ADA" or WADA. Wrapped ADA is an ERC20 token that functions the same as WETH on Ethereum. Be careful not to get these confused!
To check the available list of tokens that can be wrapped, go to Cardano Bridge Supported Native Assets section.
Moving Assets Back to Cardano (Unwrapping)
To move assets from Milkomeda C1 sidechain back to Cardano, use the Milkomeda Cardano Unwrap Bridge. Follow the steps below to unwrap milkADA and receive ADA in your Cardano mainnet wallet.
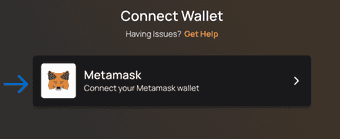
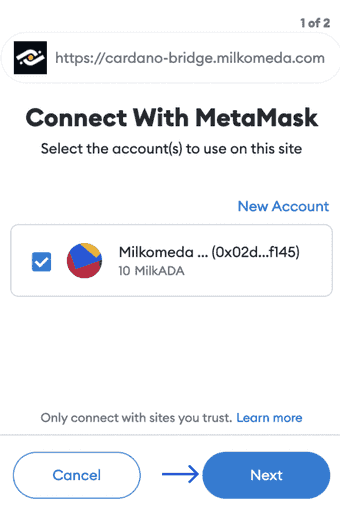
First, access the Milkomeda Cardano Unwrap Bridge and connect your MetaMask wallet.
Click "Next"
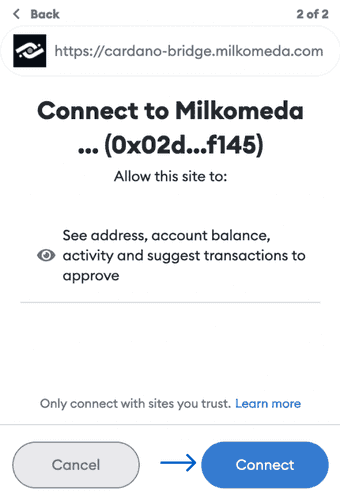
Connect to the Milkomeda C1 Sidechain
Remember to select the appropriate network in your wallet.
Only connect with sites you trust. Make sure the website URL is as follows: https://cardano-bridge.milkomeda.com
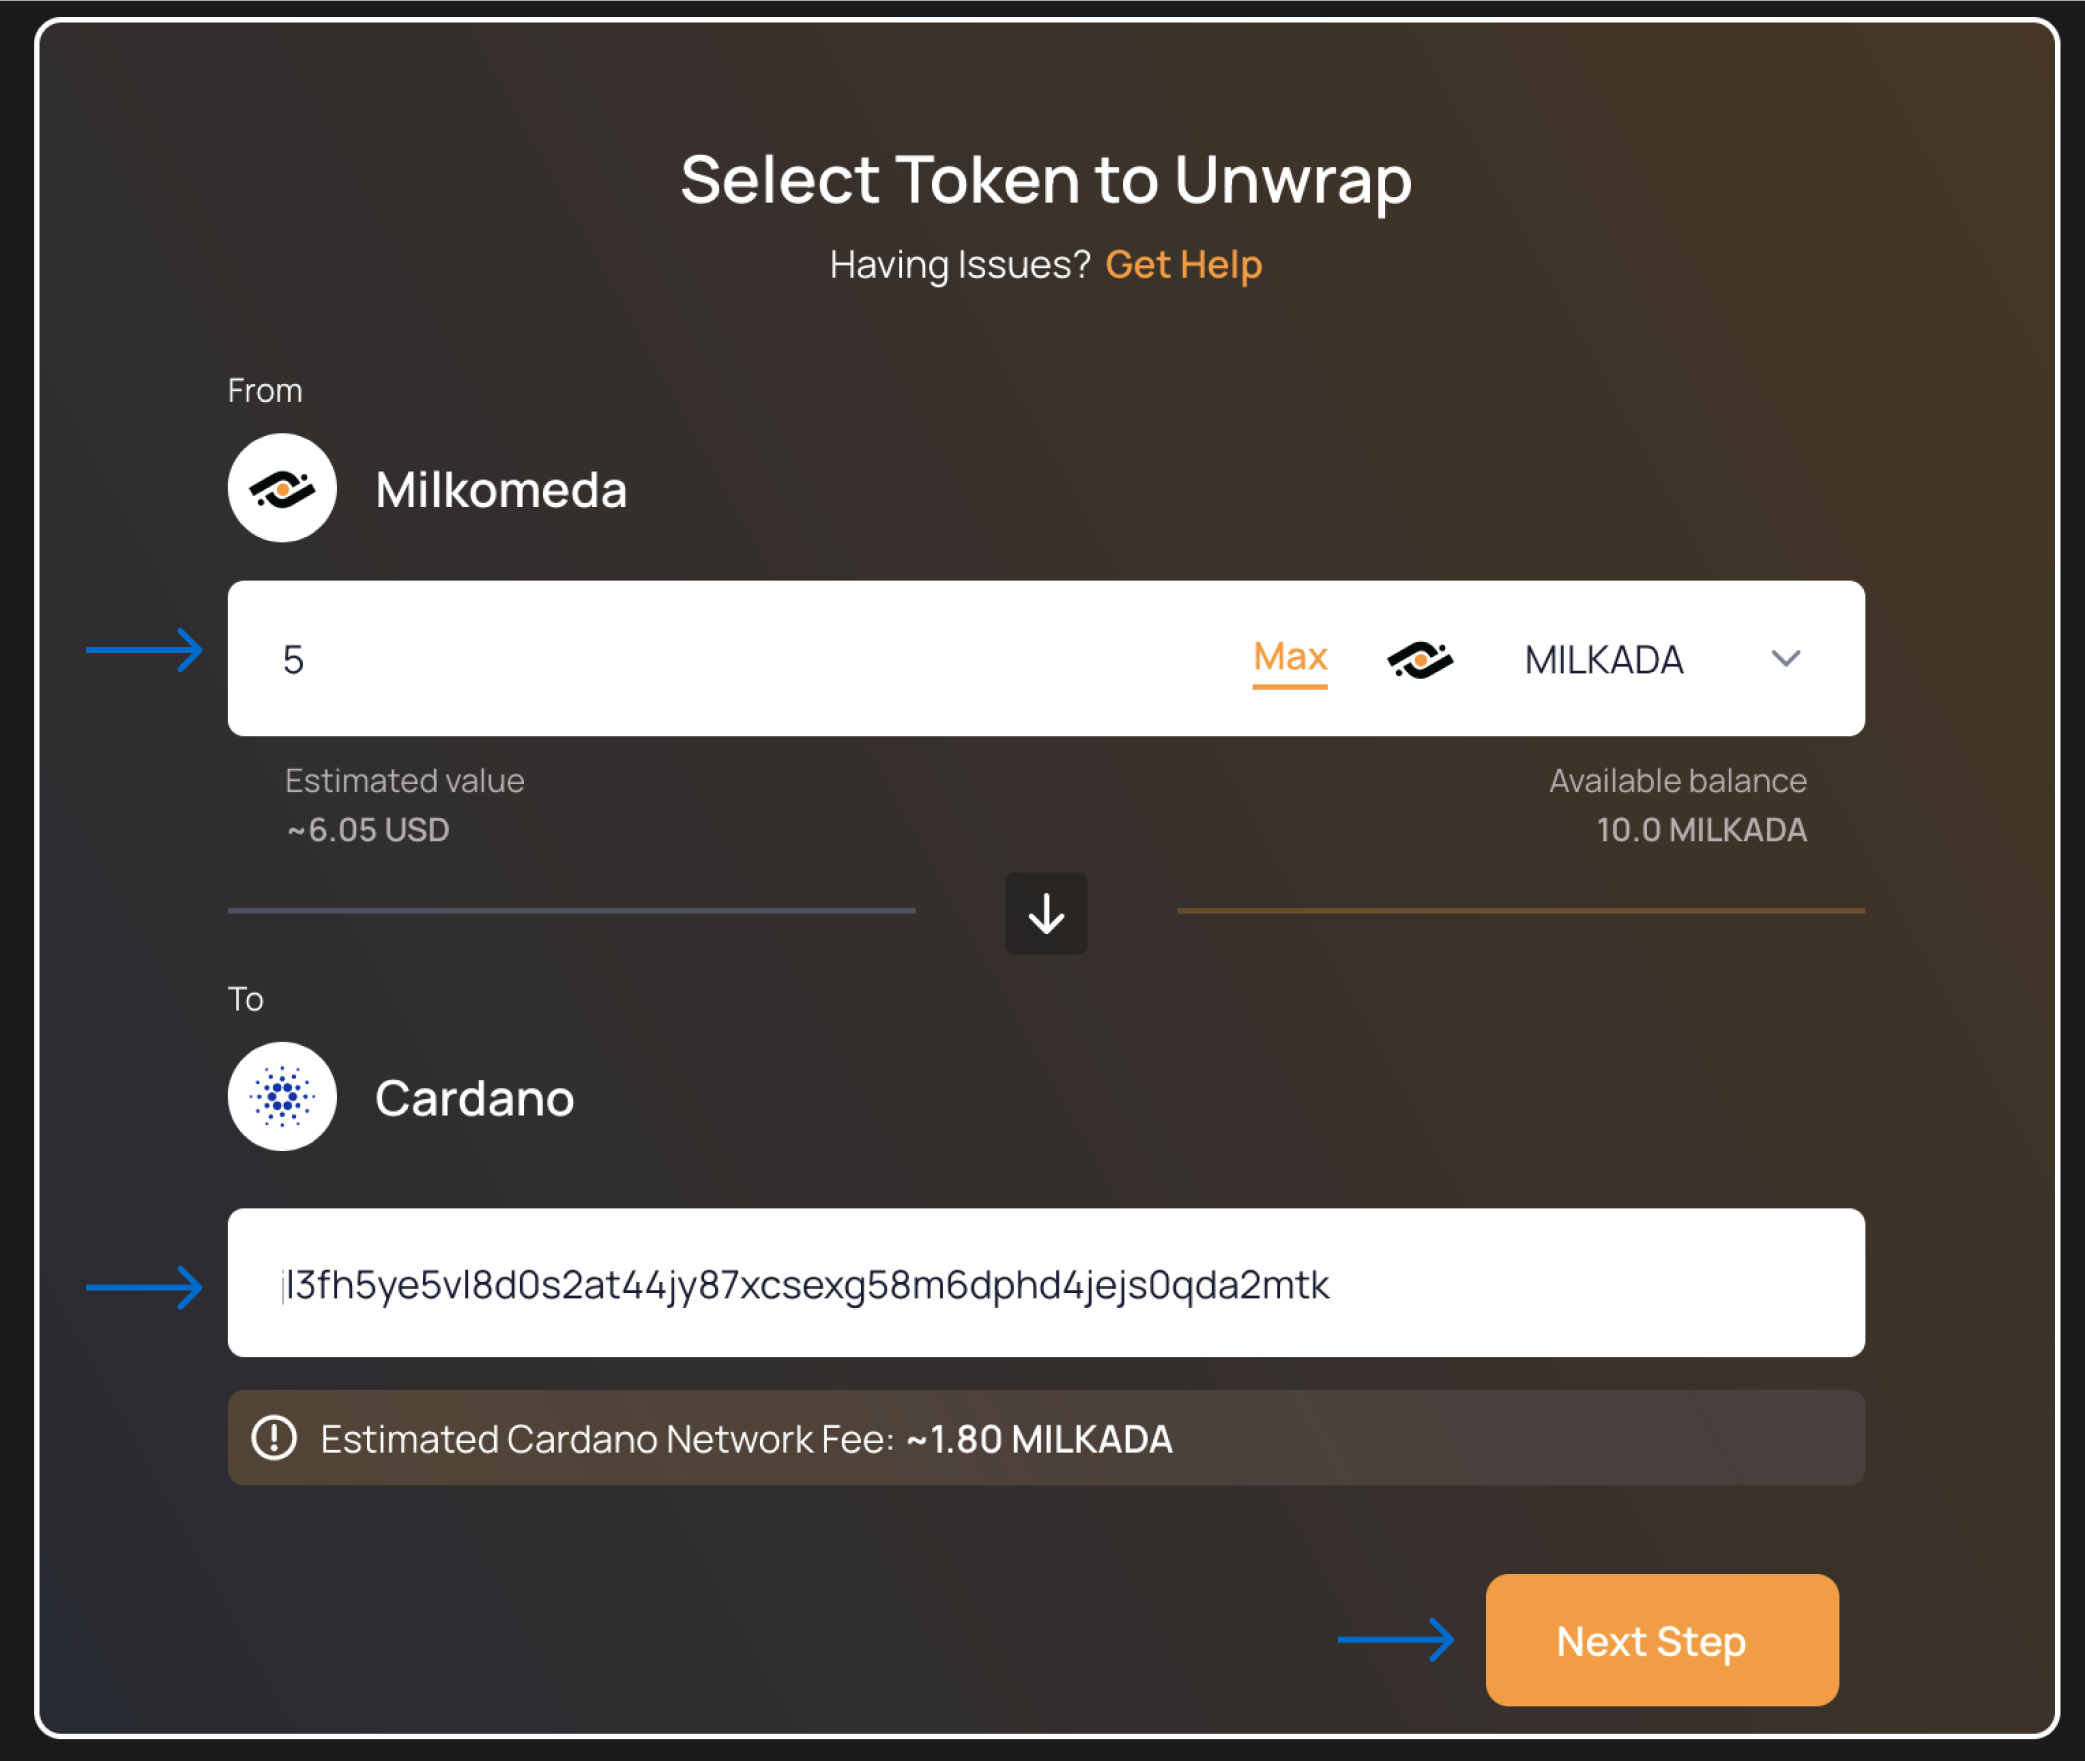
Next, enter the amount of milkADA to unwrap or click the arrow to select a different asset to unwrap, and paste your Cardano wallet address in the "To" field. Then, click the "Next Step" button.
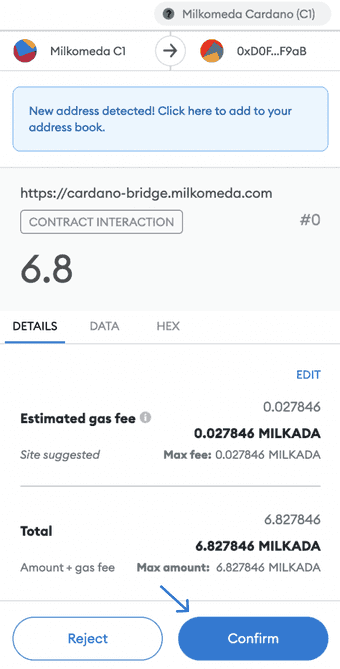
Sign the transaction for unwrapping the assets in MetaMask by clicking "Confirm".
Next, wait for blockchain confirmation.
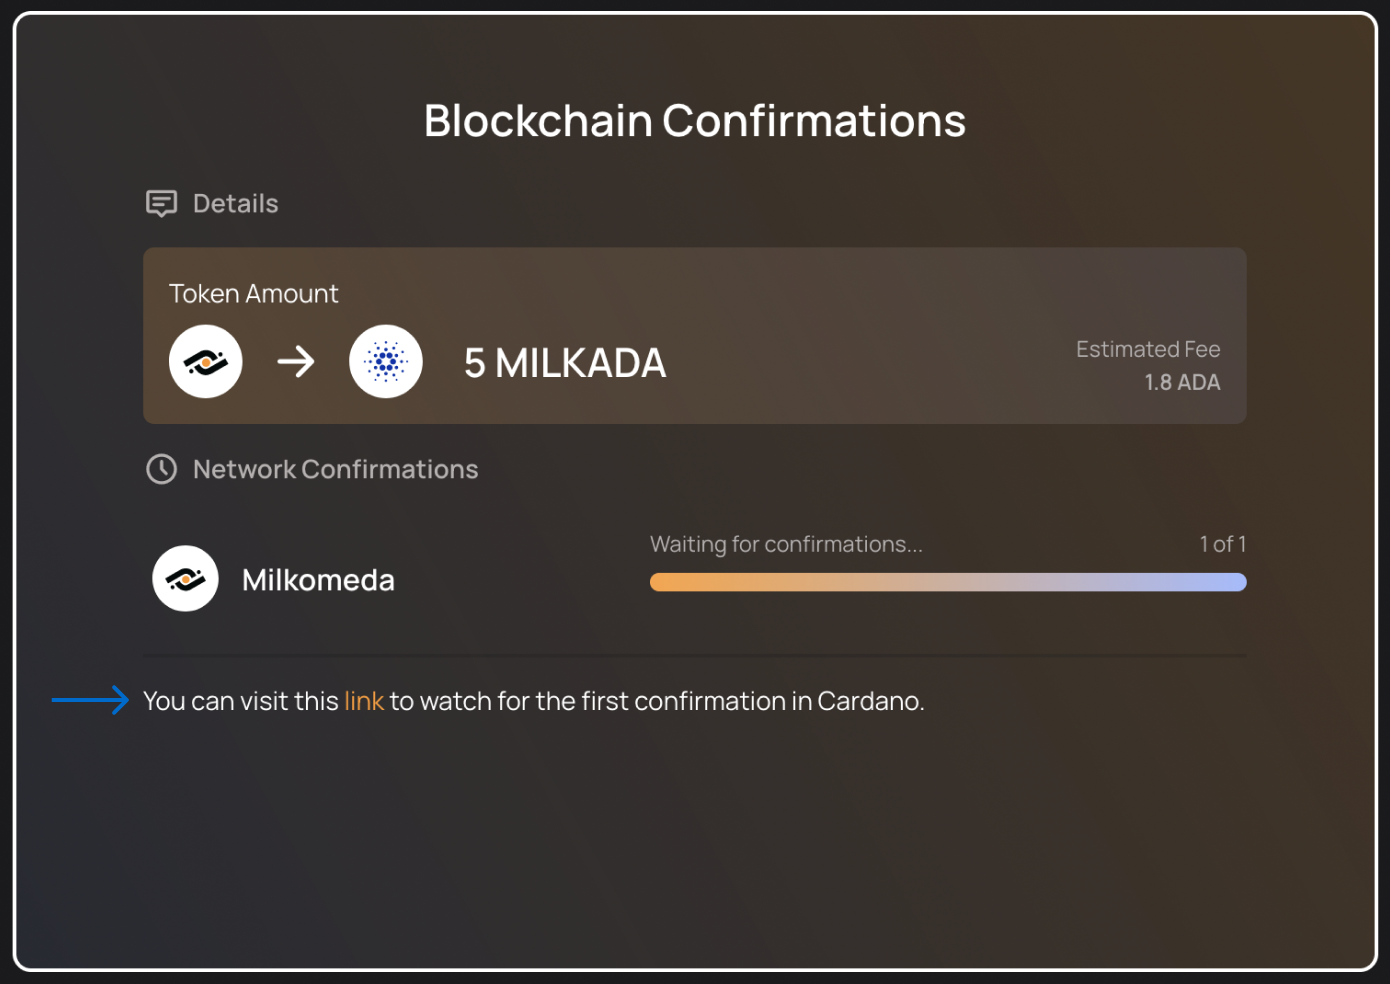
You can check the transaction details in Cardanoscan explorer for more information.
At this stage, the address bar of your browser will contain some information about the unwrapping transaction. An example is shown in the figure below.

The meaning of each of these elements in the address bar is as follows:
- The EVM unwrapping transaction ID
- The unwrapped token amount
- The name of the token being unwrapped
To look up more detailed information about the unwrapping transaction, go to Milkomeda Blockscout explorer and paste the EVM unwrapping transaction ID into the search box, as shown below.
 Look up the example transaction
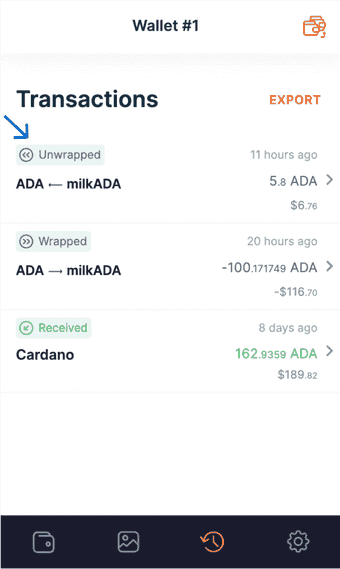
The unwrapping process is now complete. After waiting for the necessary transaction confirmations, you should see the unwrapped asset in your Cardano Mainnet wallet.
To check the available list of tokens that can be unwrapped, go to Cardano Bridge Supported Native Assets section.
Cardano Bridge Supported Native Assets
This section presents all native tokens supported by the Milkomeda Bridge to Cardano. To wrap and unwrap any supported native asset follow the step-by-step tutorial presented in For End Users section by replacing milkADA with any token from the table below.
Please, remember that the specific native asset must be added to Milkomeda Token Registry before it can be used in any of the wrapping or unwrapping operations. Hence, the list is finite and allows only for specific native tokens.
List of supported Milkomeda Native Assets:
When using Milkomeda Cardano Unwrap Bridge for unwrapping a specific native asset, select it from the drop-down list as shown below:
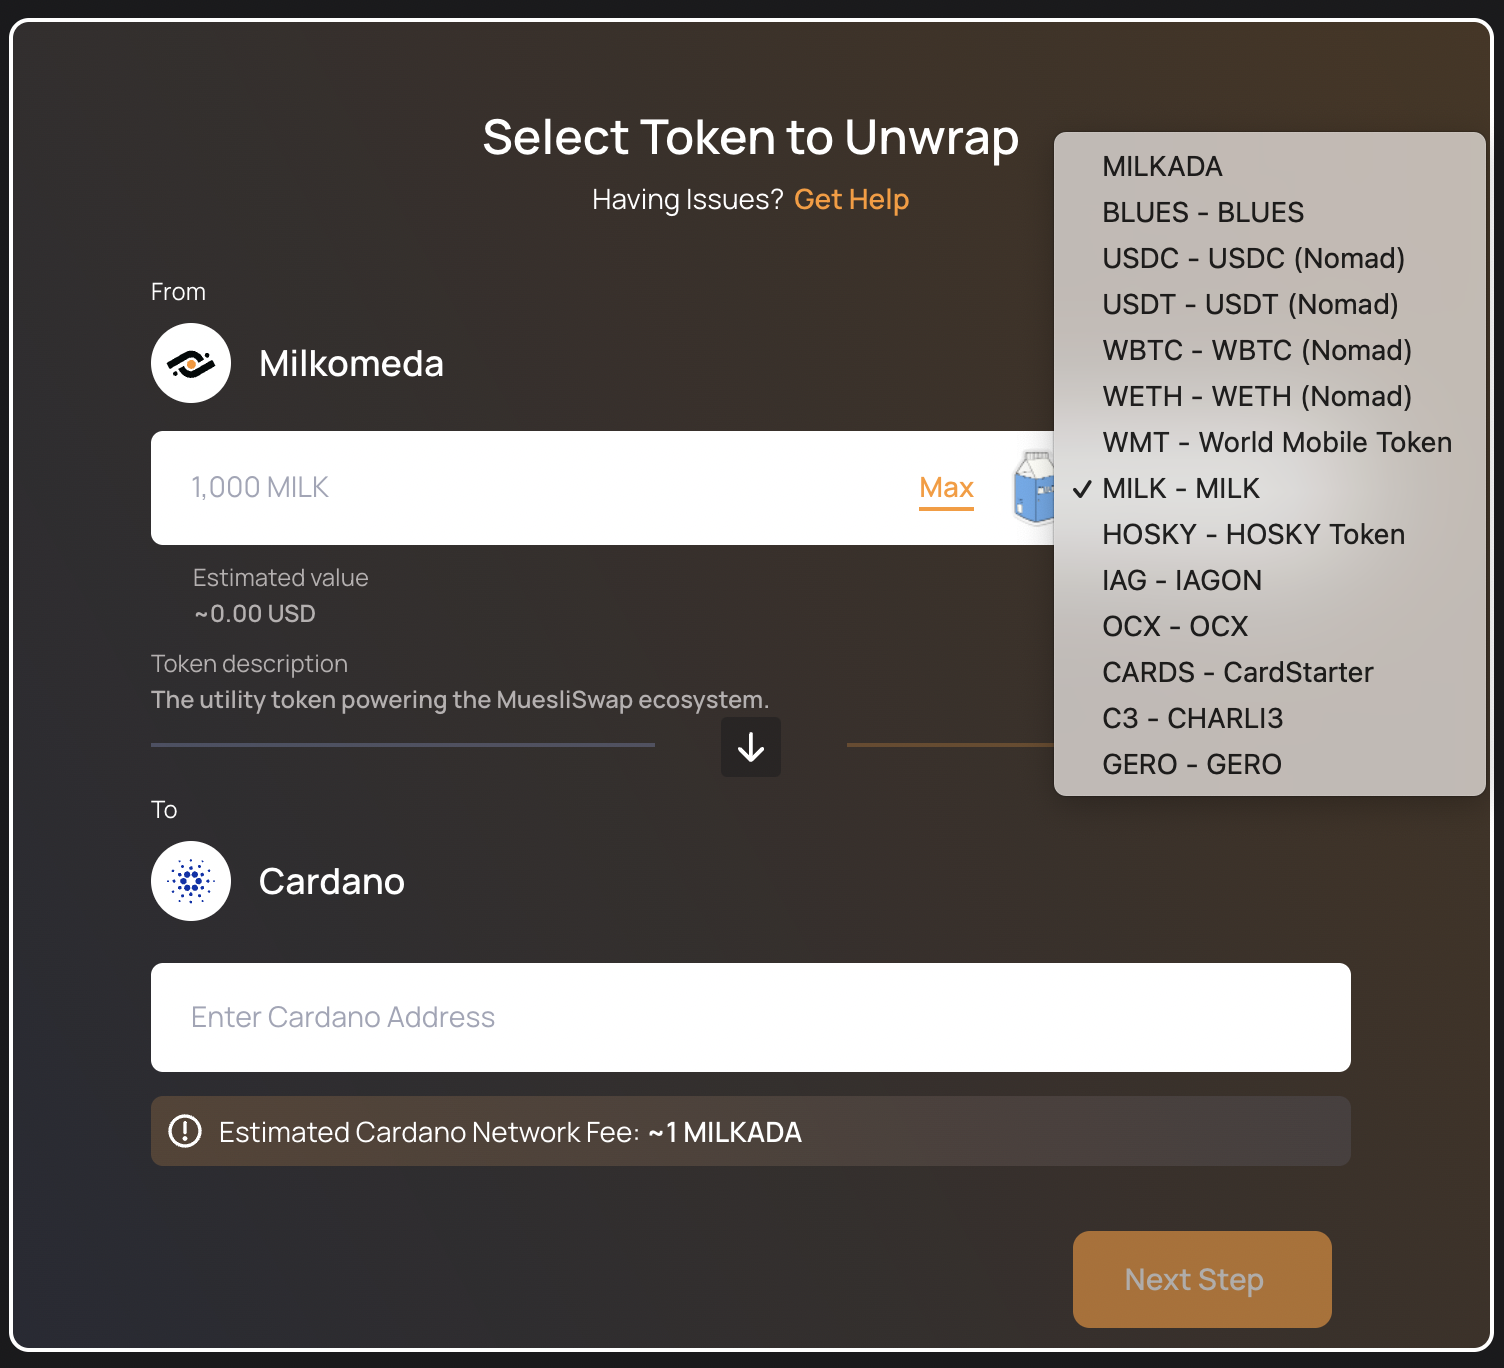
After selecting a desired native asset, you can always check its description (e.g. The utility token powering the MuesliSwap ecosystem when choosing the MILK token)
Getting Started
Milkomeda is a protocol designed to improve blockchain interoperability by delivering EVM capabilities to non-EVM blockchains. This is done by building layer 2 (L2) scaling solutions such as rollups, on which the EVM operates, and connecting these to the non-EVM blockchains, layer 1 (L1), via a permission-less bridge. A rollup is described as a “layer 2” chain. Layer 2 means that it lives on top of an existing blockchain, which is called the layer 1 or main chain, and thus is able to take advantage of the layer 1’s native, built-in properties.
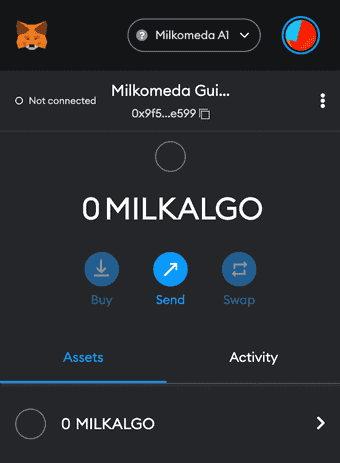
The Milkomeda A1 Rollup uses MilkALGO as its base asset for paying fees and gas. To access the Rollup, you will need a Algorand native wallet with some $ALGO, as well as the MetaMask wallet.
In the following pages we will walk through the steps to create a MyAlgo wallet, configure MetaMask to get a Milkomeda A1 address, and, finally, to send ALGOs to be converted into MilkALGO on Milkomeda Algorand Rollup. In this tutorial, you will also learn how to transfer funds back to Algorand in a process called unwrapping. In addition, we'll talk about what Algorand Standard Assets (ASAs) are and what you need to do to prepare to move these assets between the mainchain (Algorand) and the Rollup (Milkomeda).
The first step is to configure a native wallet on Algorand. In this tutorial we will use the MyAlgo wallet (you can also configure Pera Wallet, and with this you can interact with the dApp using a smartphone). Proceed to the next page to begin.
We have a suite of webpages and tools to help navigating Milkomeda:
Configuring Algorand Wallet and obtaining Test ALGO
In order to interact with the Milkomeda Algorand Rollup Bridge, you need to configure a native Algorand wallet. We recommend using MyAlgo wallet to setup a testnet wallet compatible with the Milkomeda A1 Bridge.
Configuring Your MyAlgo Wallet
First, go to https://wallet.myalgo.com/new-account. After accepting the Terms of Service click Continue to start configuring your wallet. In the next step you will be asked to create a password. Then you should create a new randomly generated account.
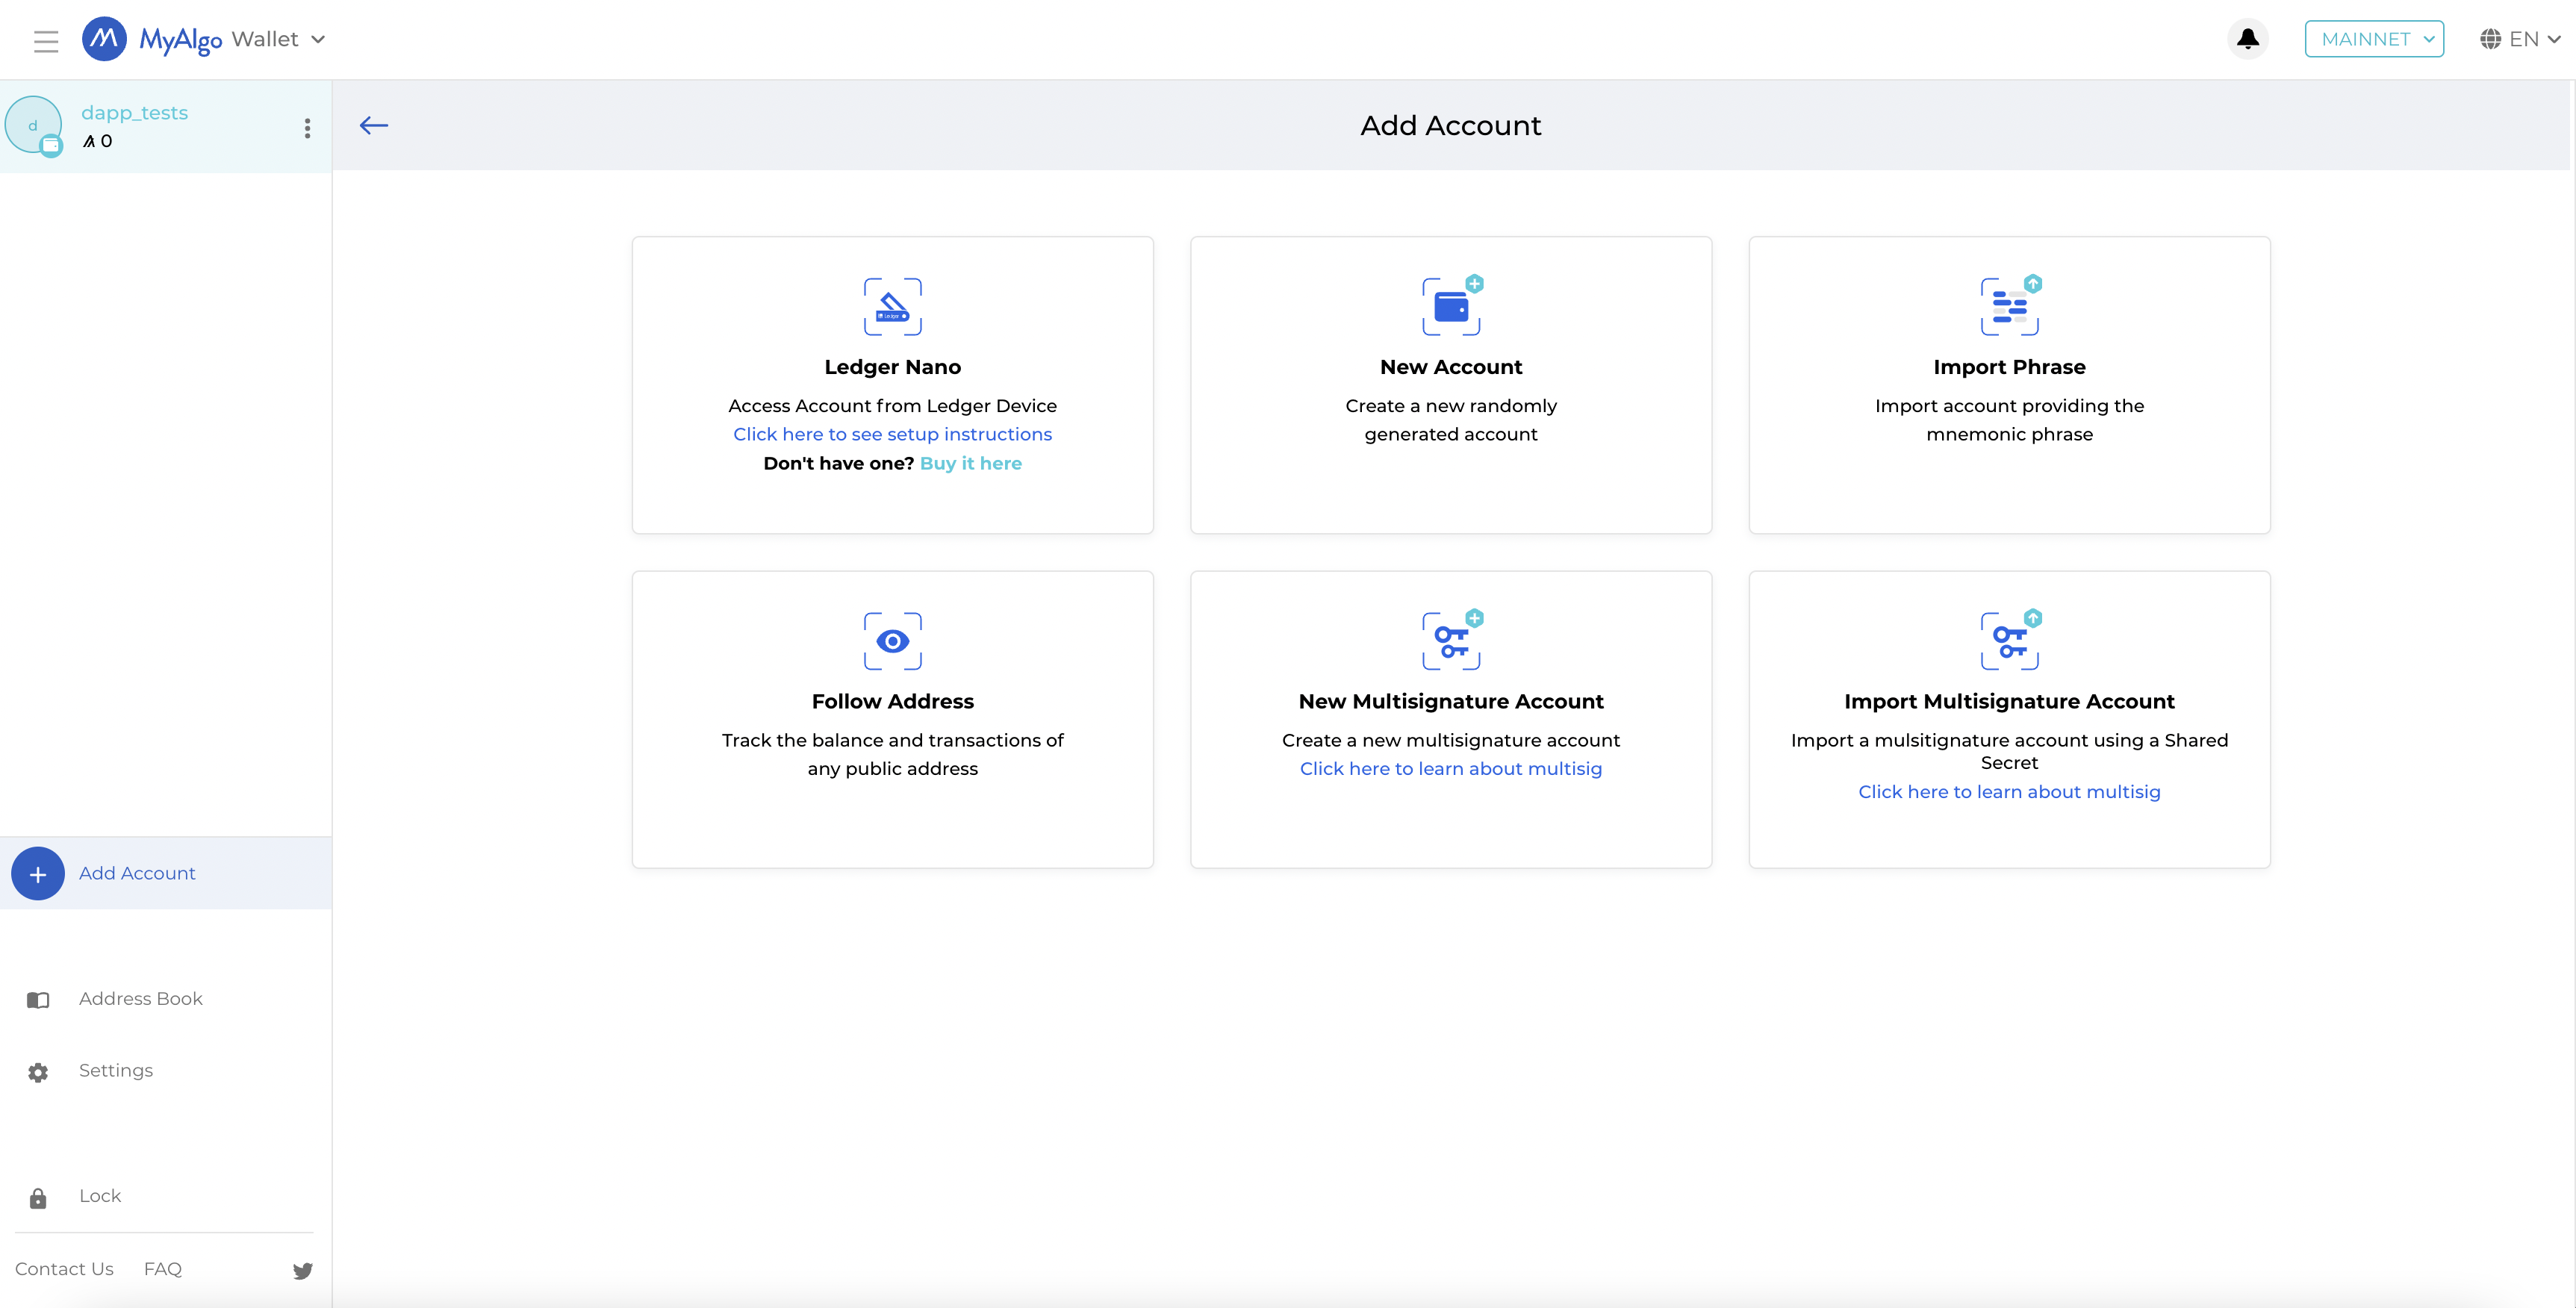
In the next step you will be asked to save the Mnemonic Phrase.
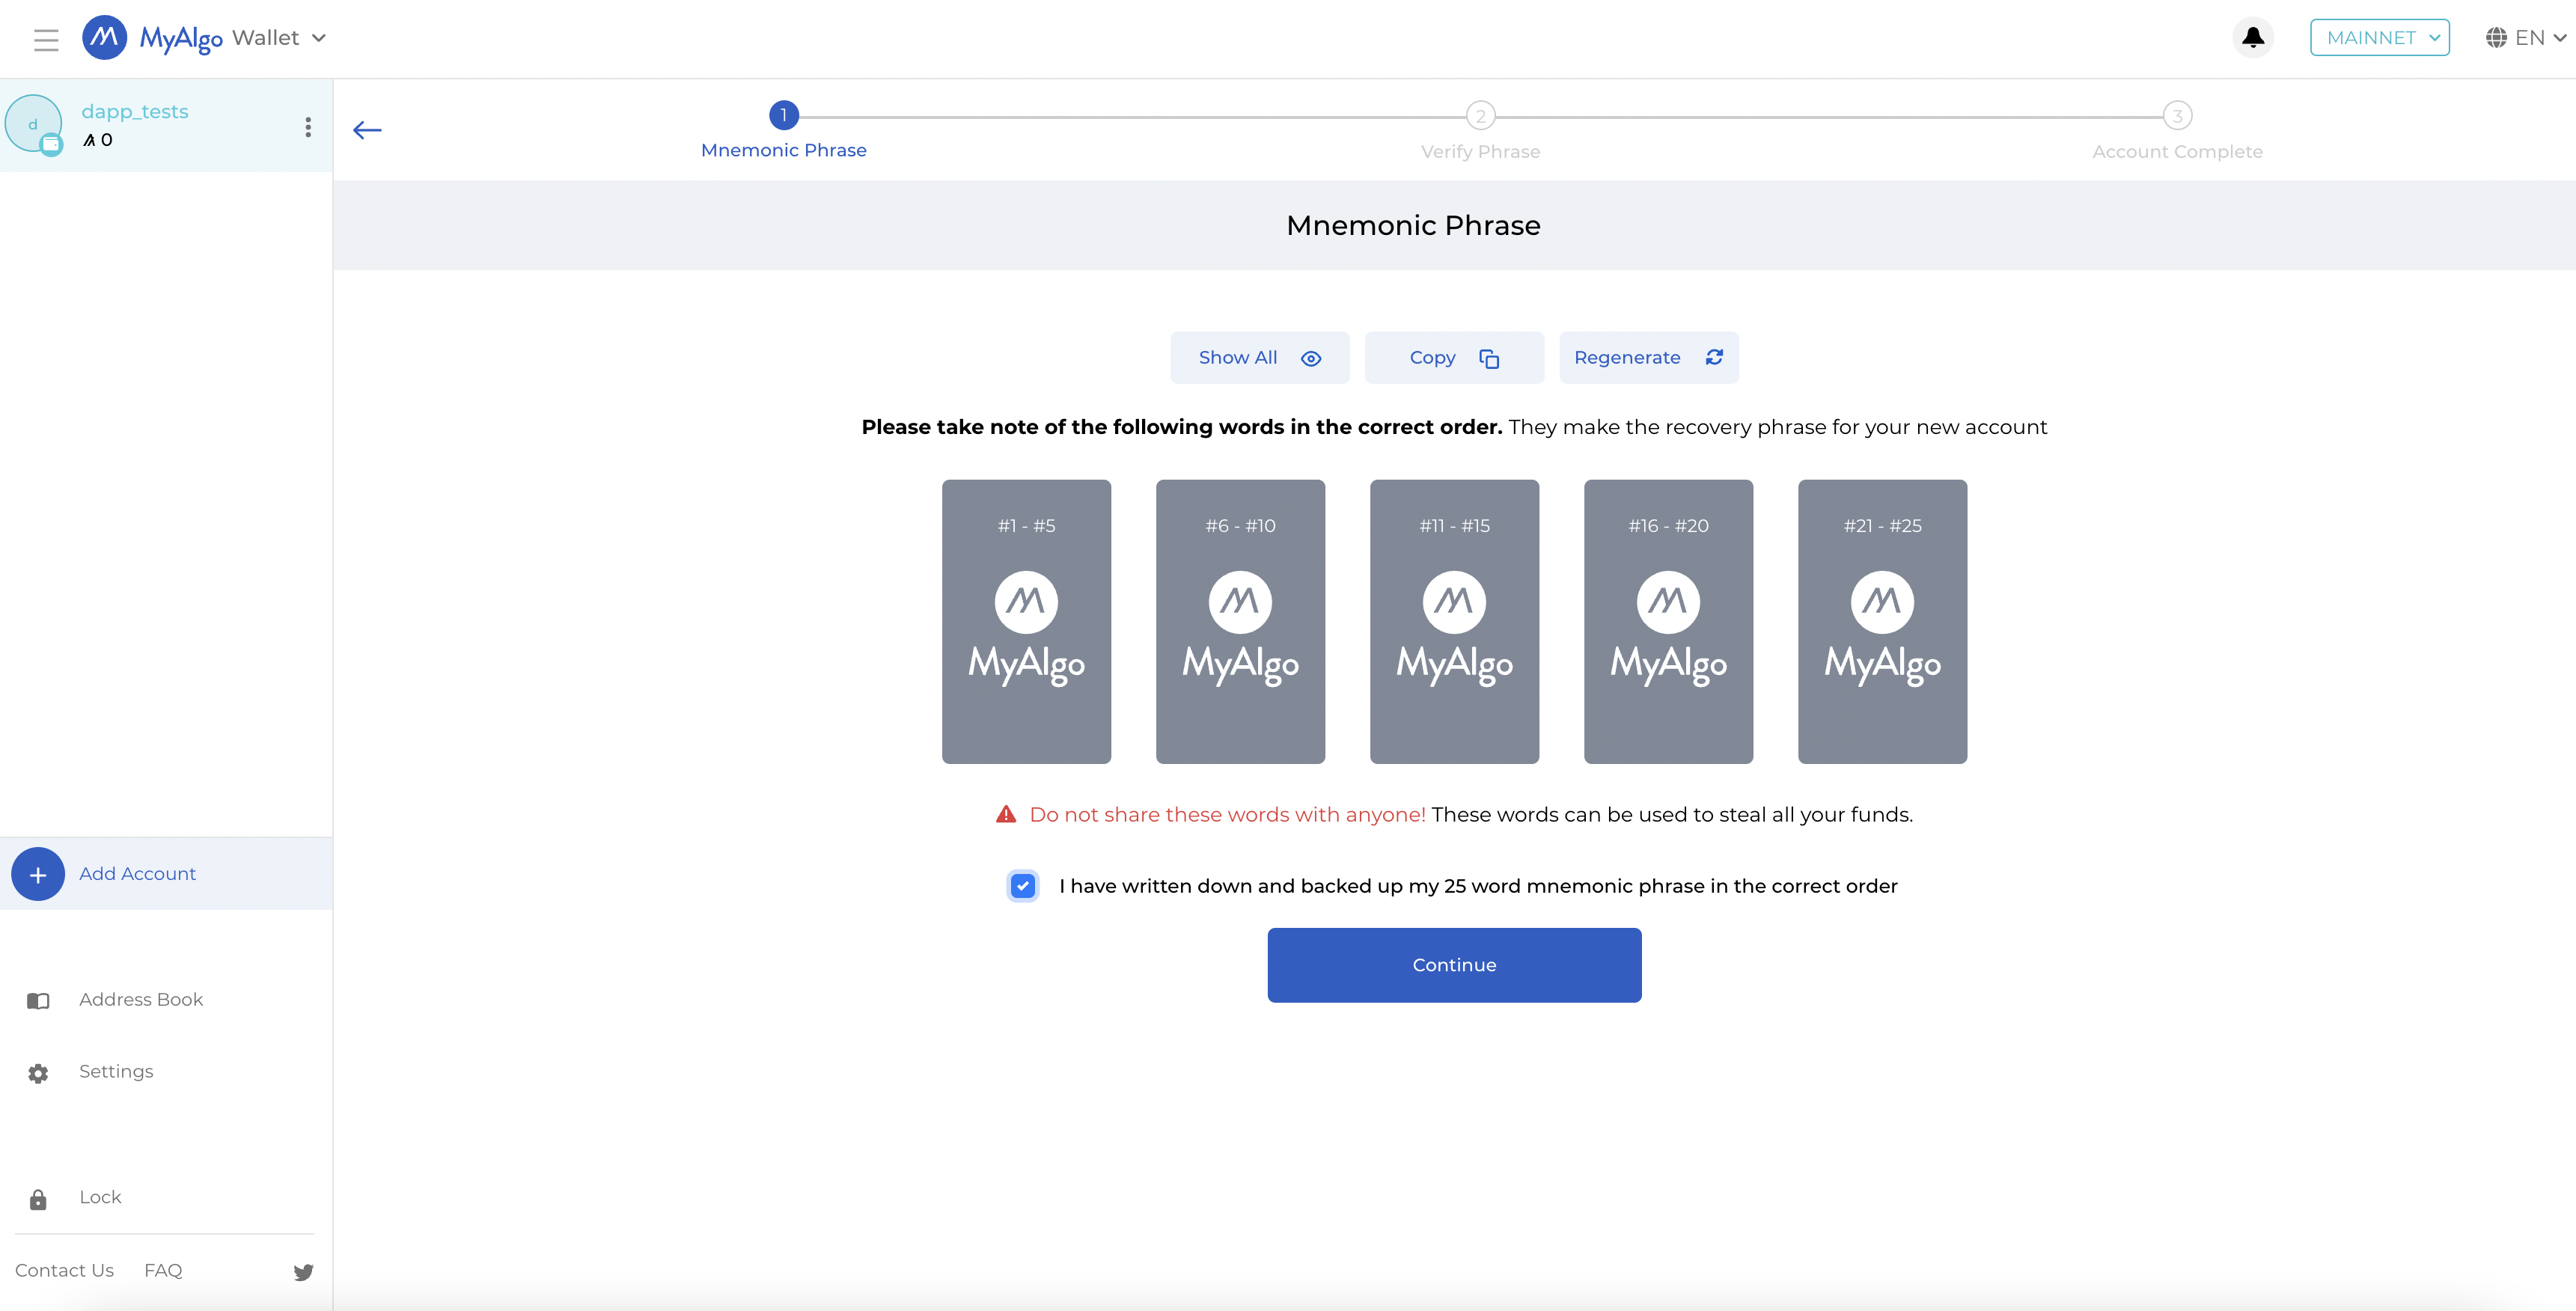
Remember to take note of the following Mnemonic Phrase words in the correct order. They are the recovery phrase for your new account.
Do not share these words with anyone! These words can be used to steal all your funds.
Once you've successfully verified the Mnemonic Phrase your MyAlgo wallet has been configured and all that's left to do is to give your wallet a name of your choosing.
Obtaining Test ALGO
To interact with the Bridge dApp you need to have the testnet ALGO token, ALGO. To start we recommend getting some testnet ALGO from the official testnet dispenser https://testnet.algoexplorer.io/dispenser.
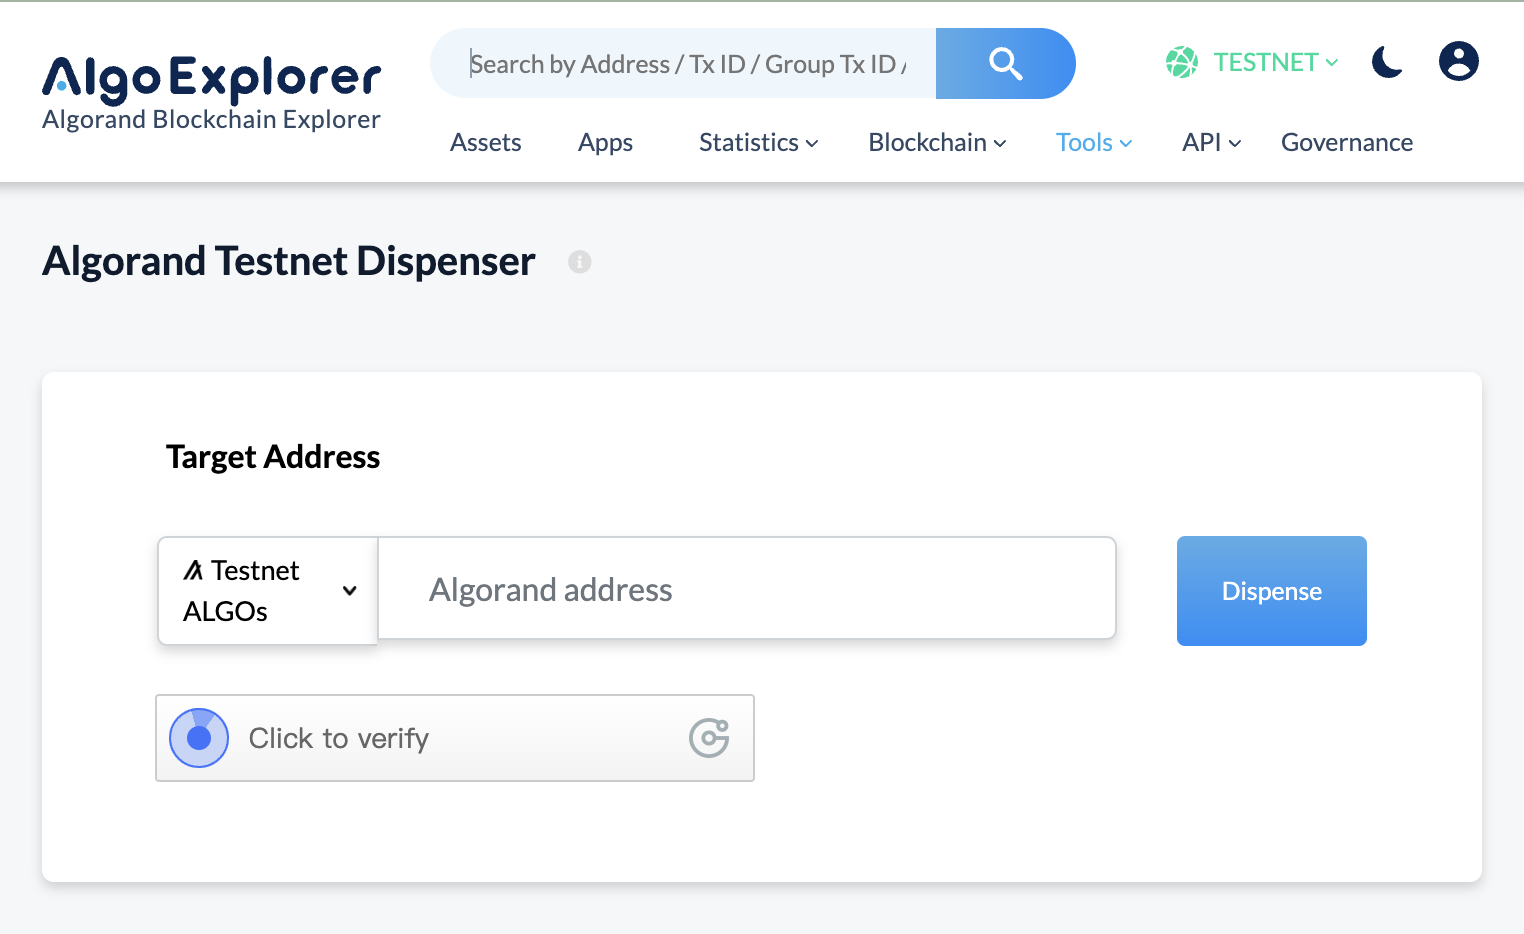
Enter your newly created Algorand address and after waiting a few minutes (usually 2 minutes or less), you should be able to see some tALGO in your Algorand Testnet wallet.
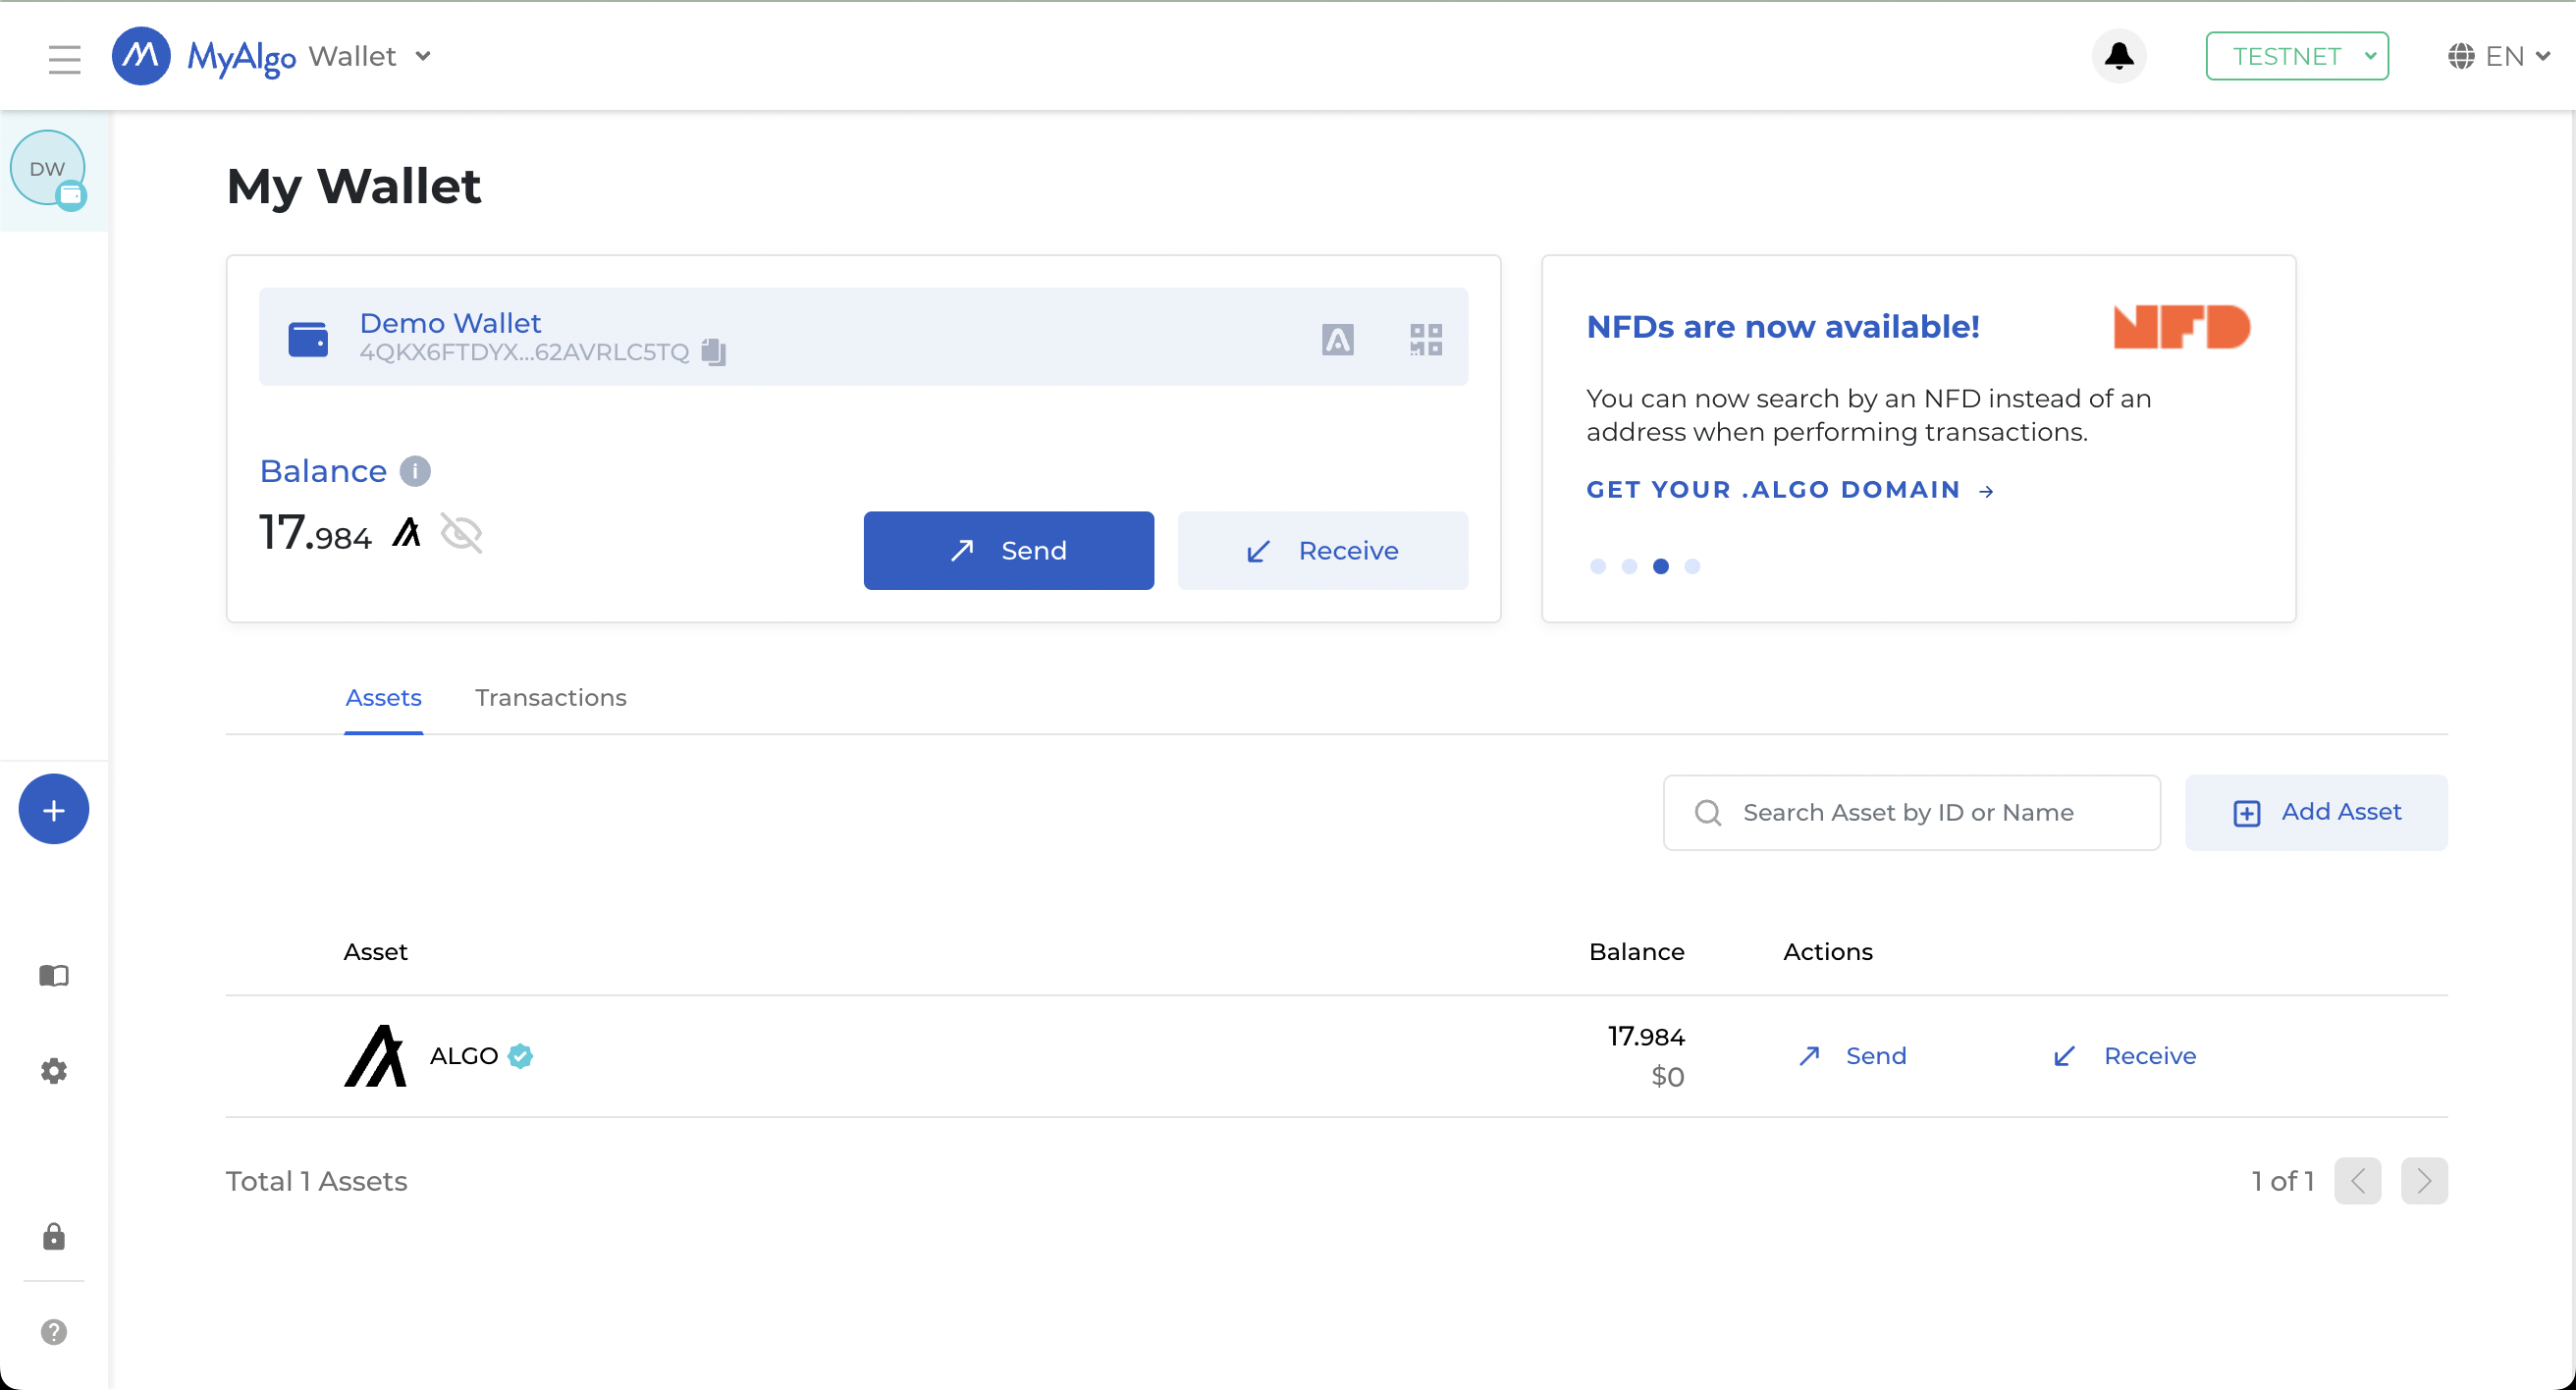
Next we will set up MetaMask Wallet and get an address on the Milkomeda A1 Algorand Rollup.
Configuring MetaMask
Now that we have an Algorand testnet wallet and some test ALGO, we need an address on the Milkomeda Algorand A1 Rollup testnet where we can receive our MilkTALGO. We recommend using MetaMask for this step.
First, install MetaMask for Chrome, then click the Chrome Extensions icon ![]() and select MetaMask. Within the MetaMask window, click "Get Started" and then "Create a Wallet". Set a wallet password and click through the rest of the setup screens. When you're finished, you will have a new, empty wallet, as shown below. Select the network dropdown in the top right corner of the MetaMask screen.
and select MetaMask. Within the MetaMask window, click "Get Started" and then "Create a Wallet". Set a wallet password and click through the rest of the setup screens. When you're finished, you will have a new, empty wallet, as shown below. Select the network dropdown in the top right corner of the MetaMask screen.
From the dropdown list, select “Add Network” and enter the following:
Network Name: Milkomeda Algorand Testnet
New RPC URL: https://rpc-devnet-algorand-rollup.a1.milkomeda.com
Chain ID: 200202
Currency Symbol (Optional): milkTALGO
Block Explorer URL (Optional): https://testnet-algorand-rollup.a1.milkomeda.com
To interact with Milkomeda A1 Mainnet, use following network details:
Network Name: Milkomeda Algorand mainnet
New RPC URL: https://rpc-mainnet-algorand-rollup.a1.milkomeda.com
Chain ID: 2002
Currency Symbol (Optional): milkAlgo
Block Explorer URL (Optional): https://explorer-mainnet-algorand-rollup.a1.milkomeda.com
Click “Save”, and you will now see Milkomeda Algorand Testnet in the network dropdown list. Copy your Milkomeda Algorand Testnet wallet address from MetaMask to the clipboard by clicking on the account name, as shown.
Next we will go to the Milkomeda A1 Bridge dApp and send our test ALGO to the Bridge to be wrapped.
Wrapping Assets
In order to transfer assets from Algorand (mainchain) to the Milkomeda A1 Rollup, you need to use our dedicated Bridge dApp. To wrap your assets onto the A1 Rollup go to the Milkomeda A1 bridge dApp at https://algorand-bridge-dev.milkomeda.com/.
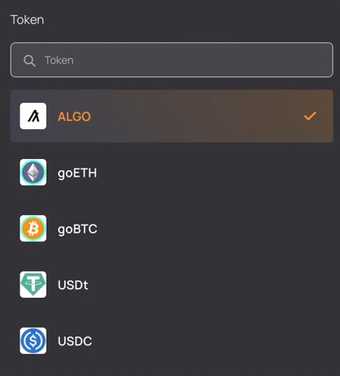
To start wrapping your assets, choose the Algorand to Milkomeda direction from the "Network Origin" dropdown menu. Then select the token you want to wrap (in this tutorial, we will use ALGO) from the "Select Token" dropdown menu.
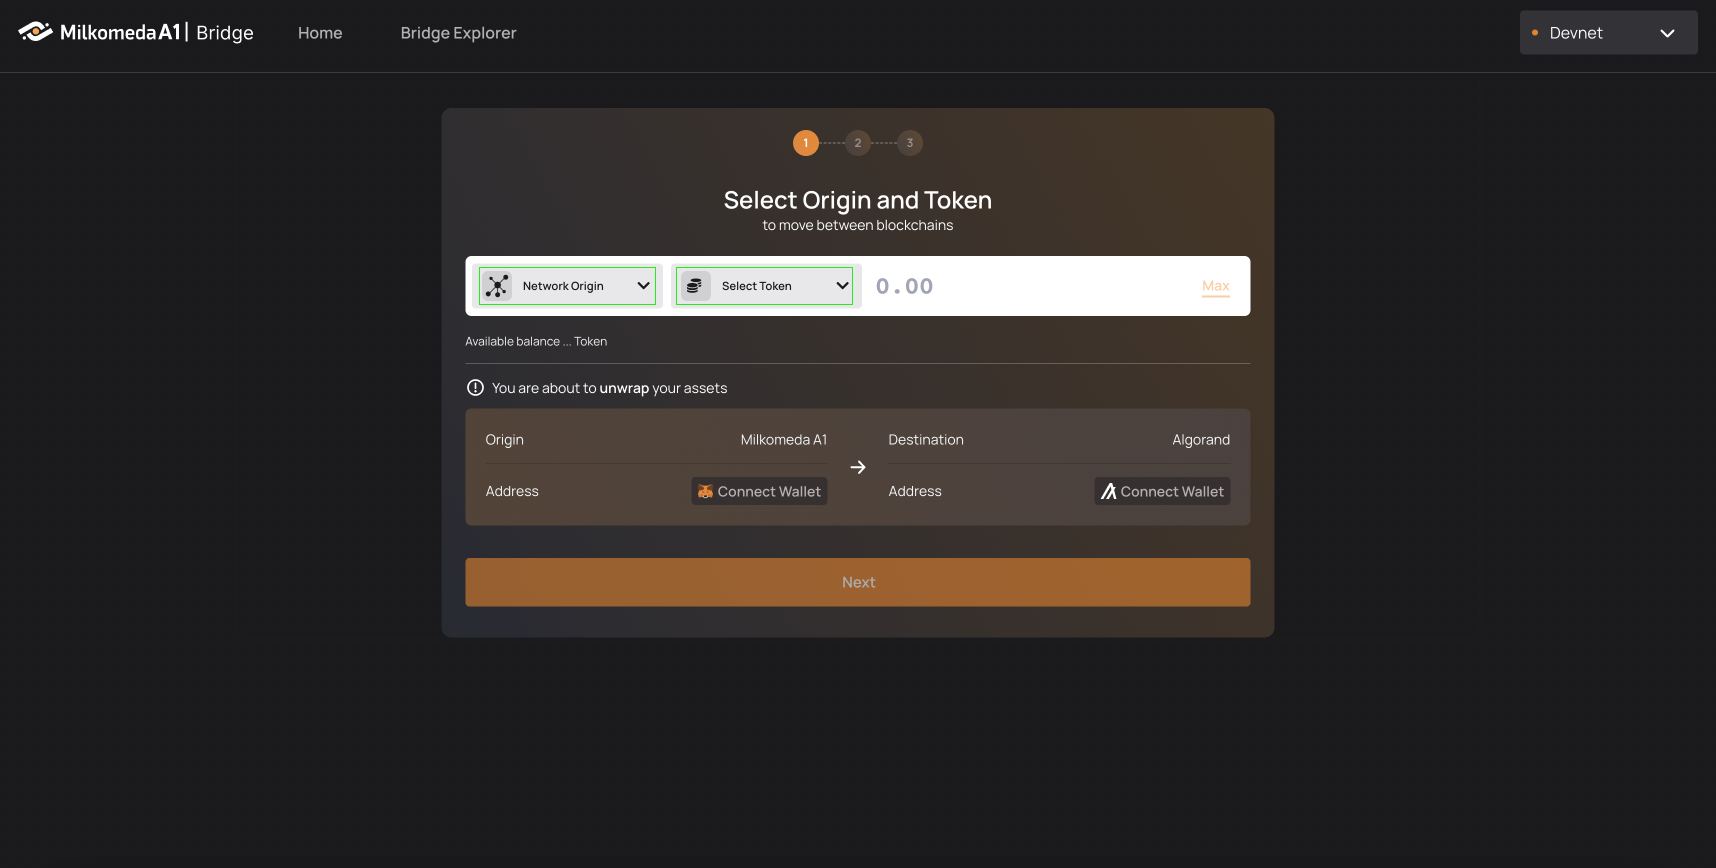
The next step is to log in to your MyAlgo and MetaMask wallets.
Click “Connect Wallet” on the Origin side and your MyAlgo wallet (we recently added support for Pera wallet too) will require you to enter your password and confirm which account to connect to the dApp. Your available ALGO balance will then be displayed below the "Select Token" field.
Click “Connect Wallet” on the Destination side of the dApp and your Metamask wallet will ask you to confirm that you want to switch networks (if you are not already connected to it) to the Milkomeda A1 network.
Enter how many test ALGOs you want to transfer to the A1 rollup (if you want to send your whole balance click “Max” to have the bridge calculate the maximum amount you can send minus the transaction fee).
Click “Next” to view a transaction summary, complete with “Estimated Fees” and an “Estimated Wrapping Confirmation Time”.
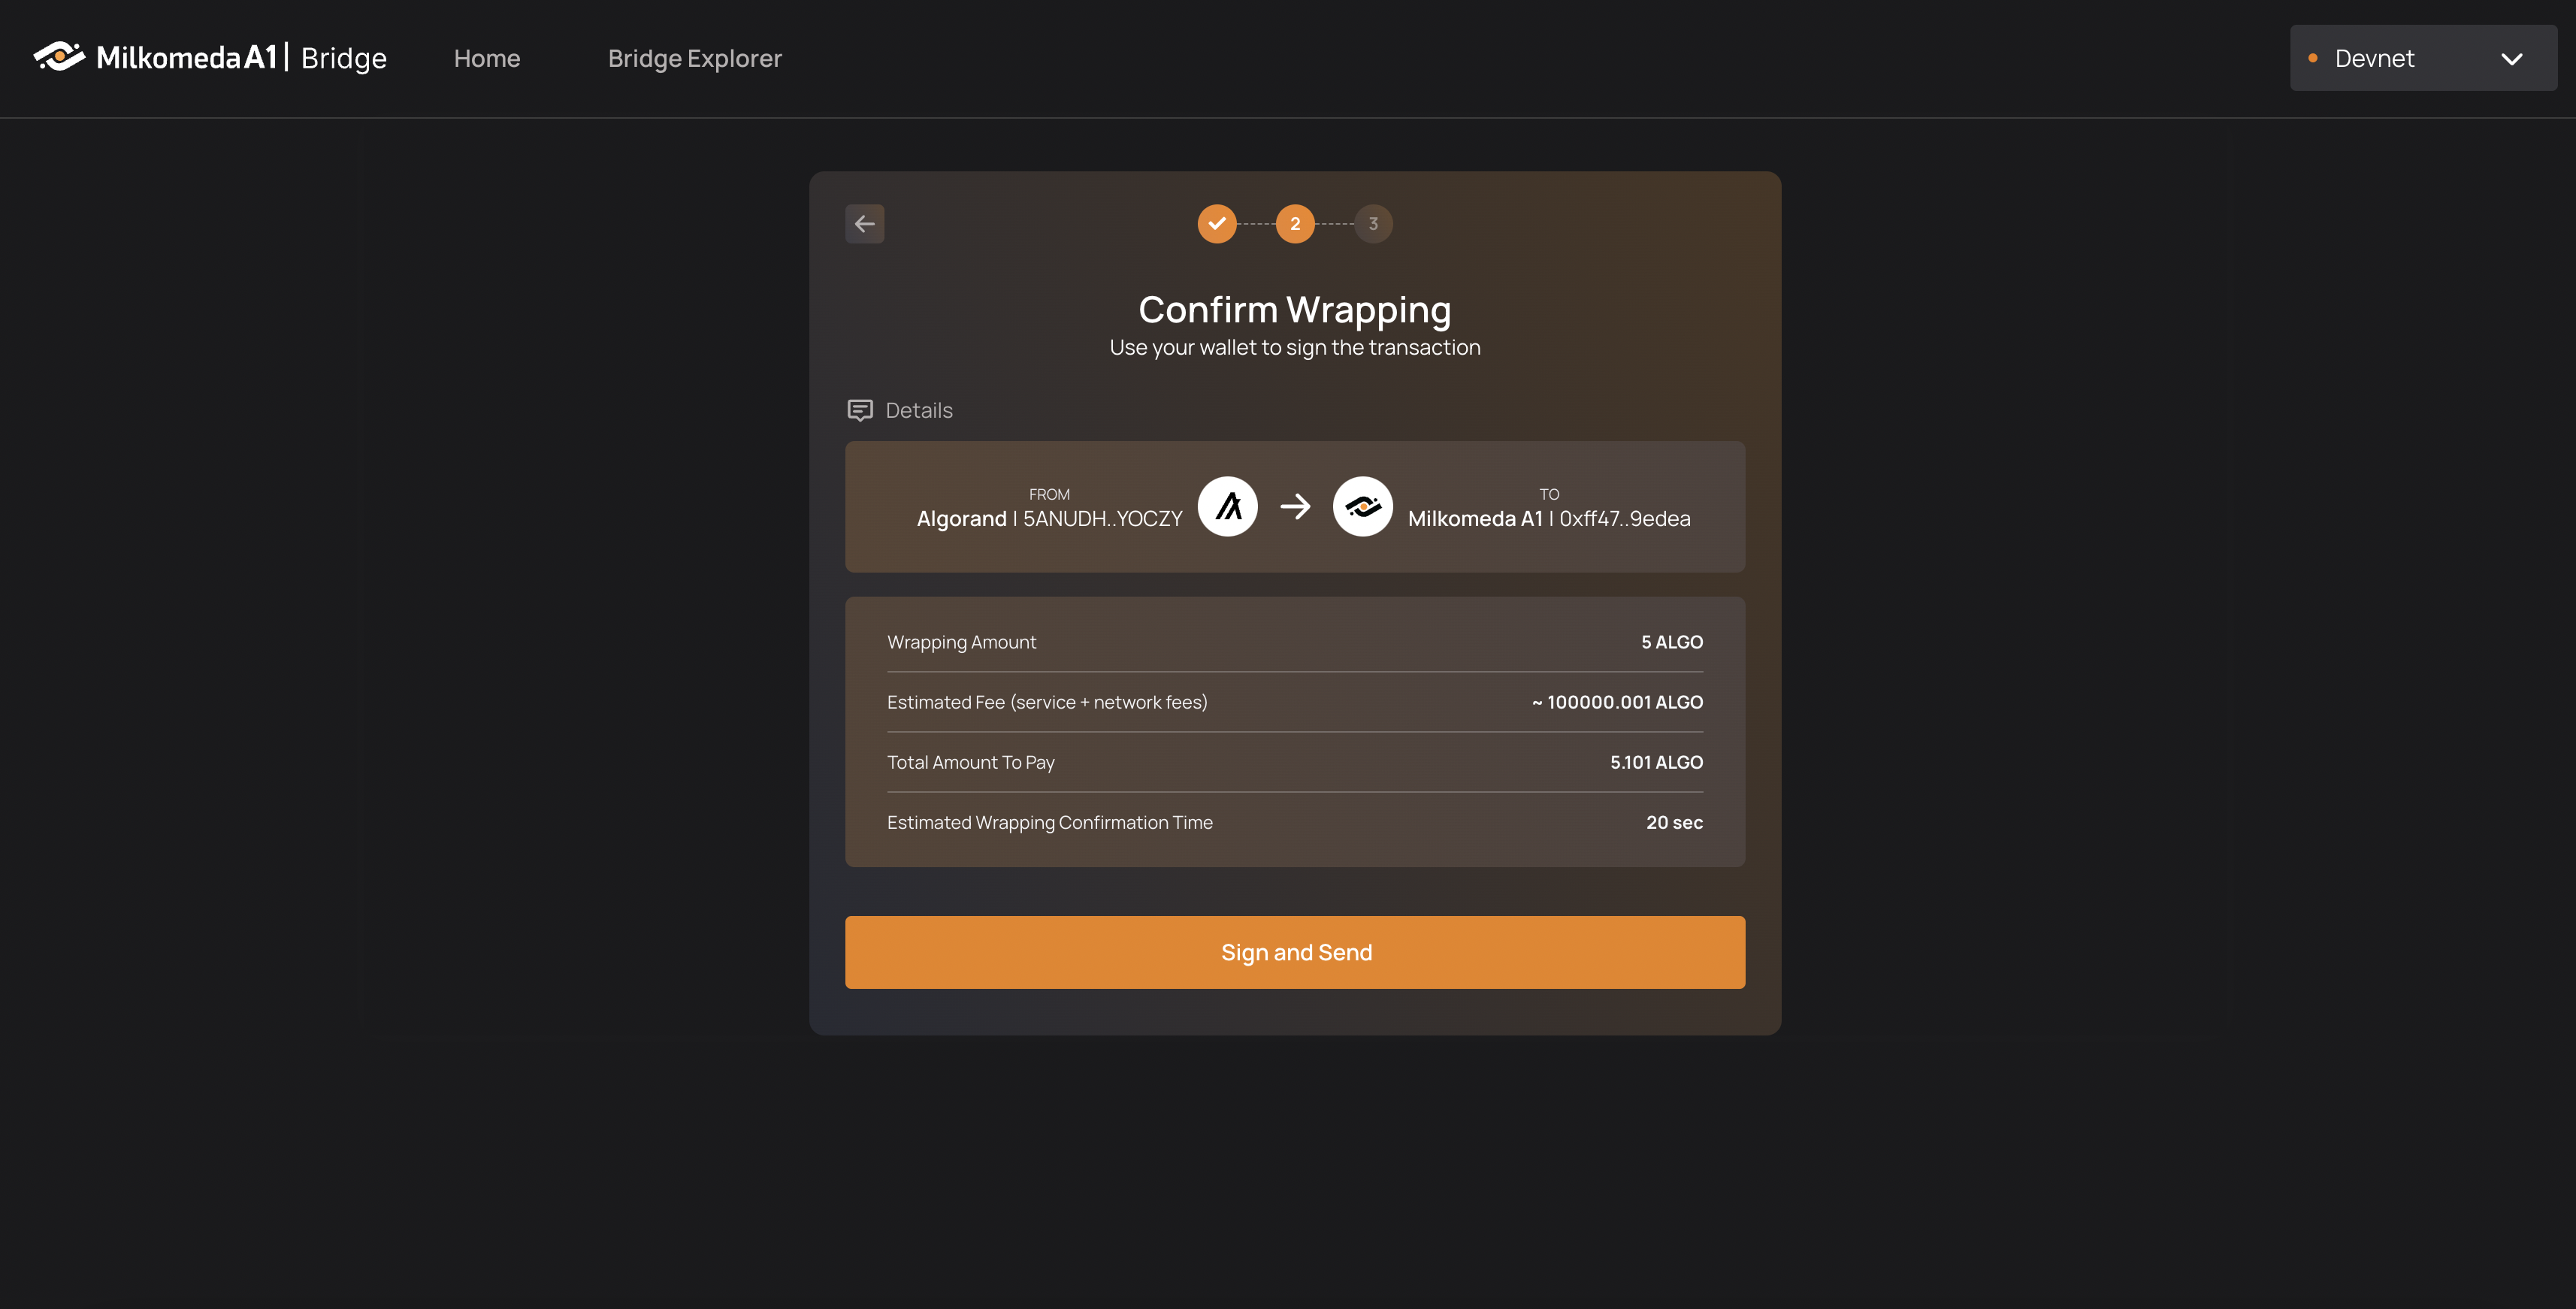
Click “Sign and Send”, enter your wallet password, and hit confirm. Now watch as your tokens get sent to the bridge, wrapped, and sent to your MetaMask wallet on the Milkomeda Algorand A1 Rollup! The process should take around 20 seconds to confirm.
Remember that transactions from the Rollup are written to the Algorand Testnet blockchain itself. So one confirmation is for sending funds from the wallet to the bridge address and the second confirmation is for the rollup batch transaction on Algorand.
The transfer only requires a total of 2 confirmations, which should take approximately 20 seconds (4.5 seconds for Algorand and around 14 seconds for the batch of the Rollup). Once the transaction is confirmed, the transferred MilkTALGO should be visible in your Milkomeda Algorand Testnet wallet in MetaMask.
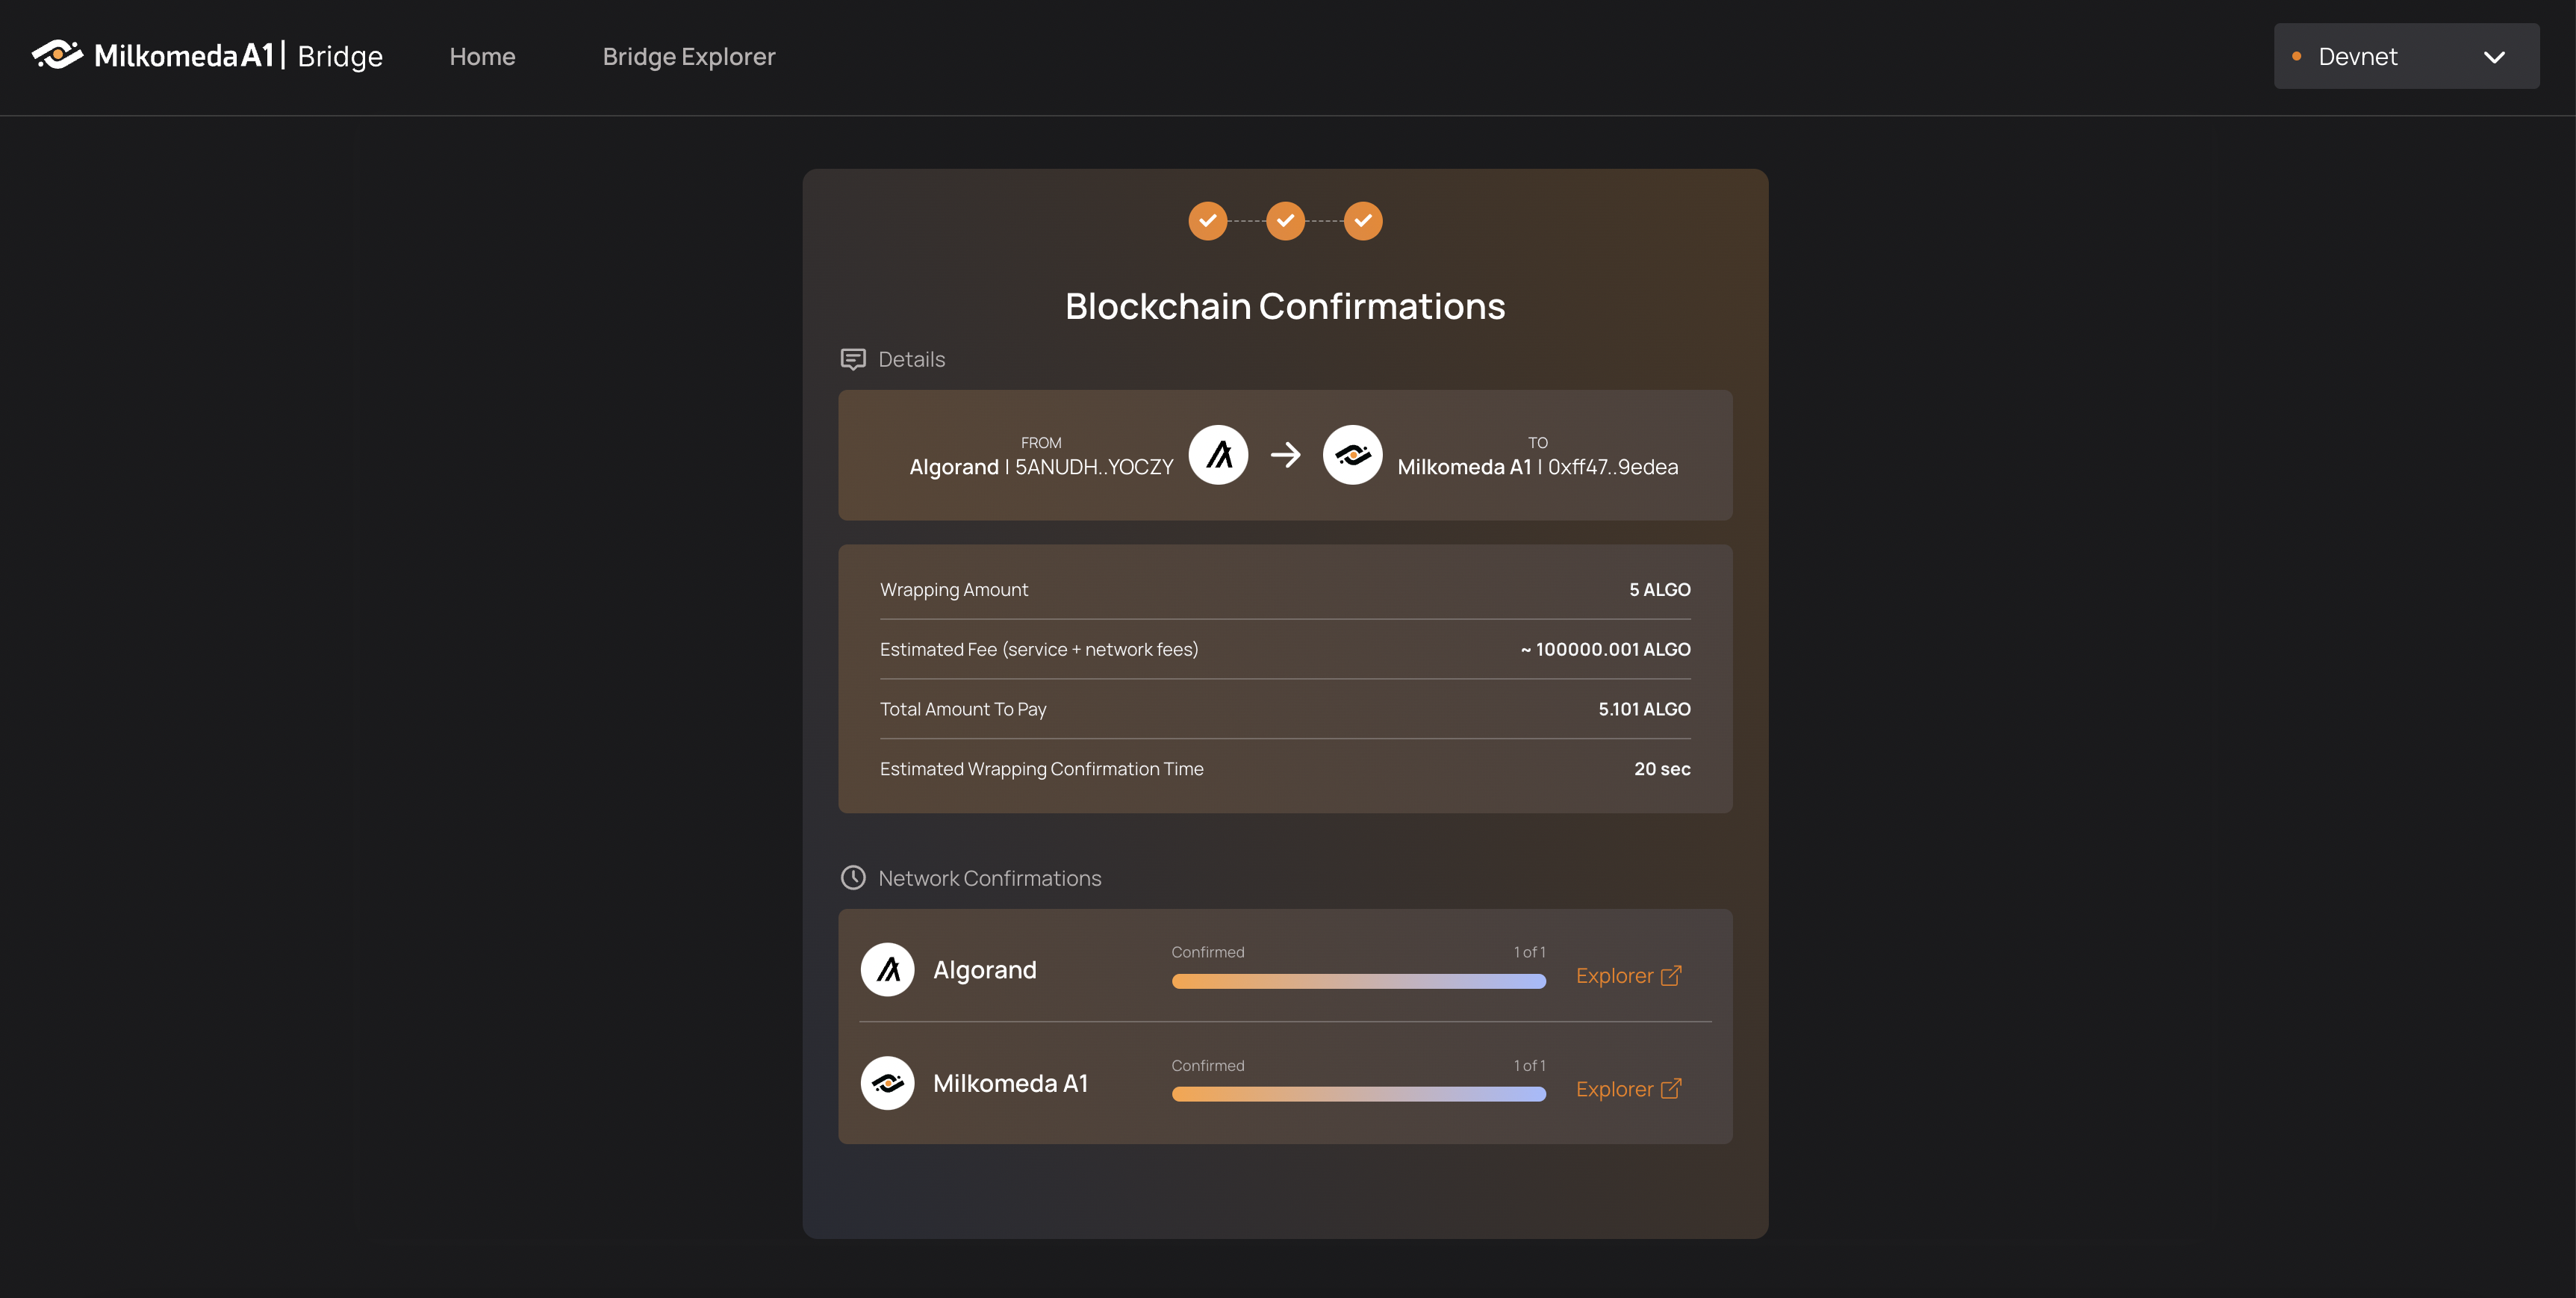
You can now watch your transaction pass through the bridge.
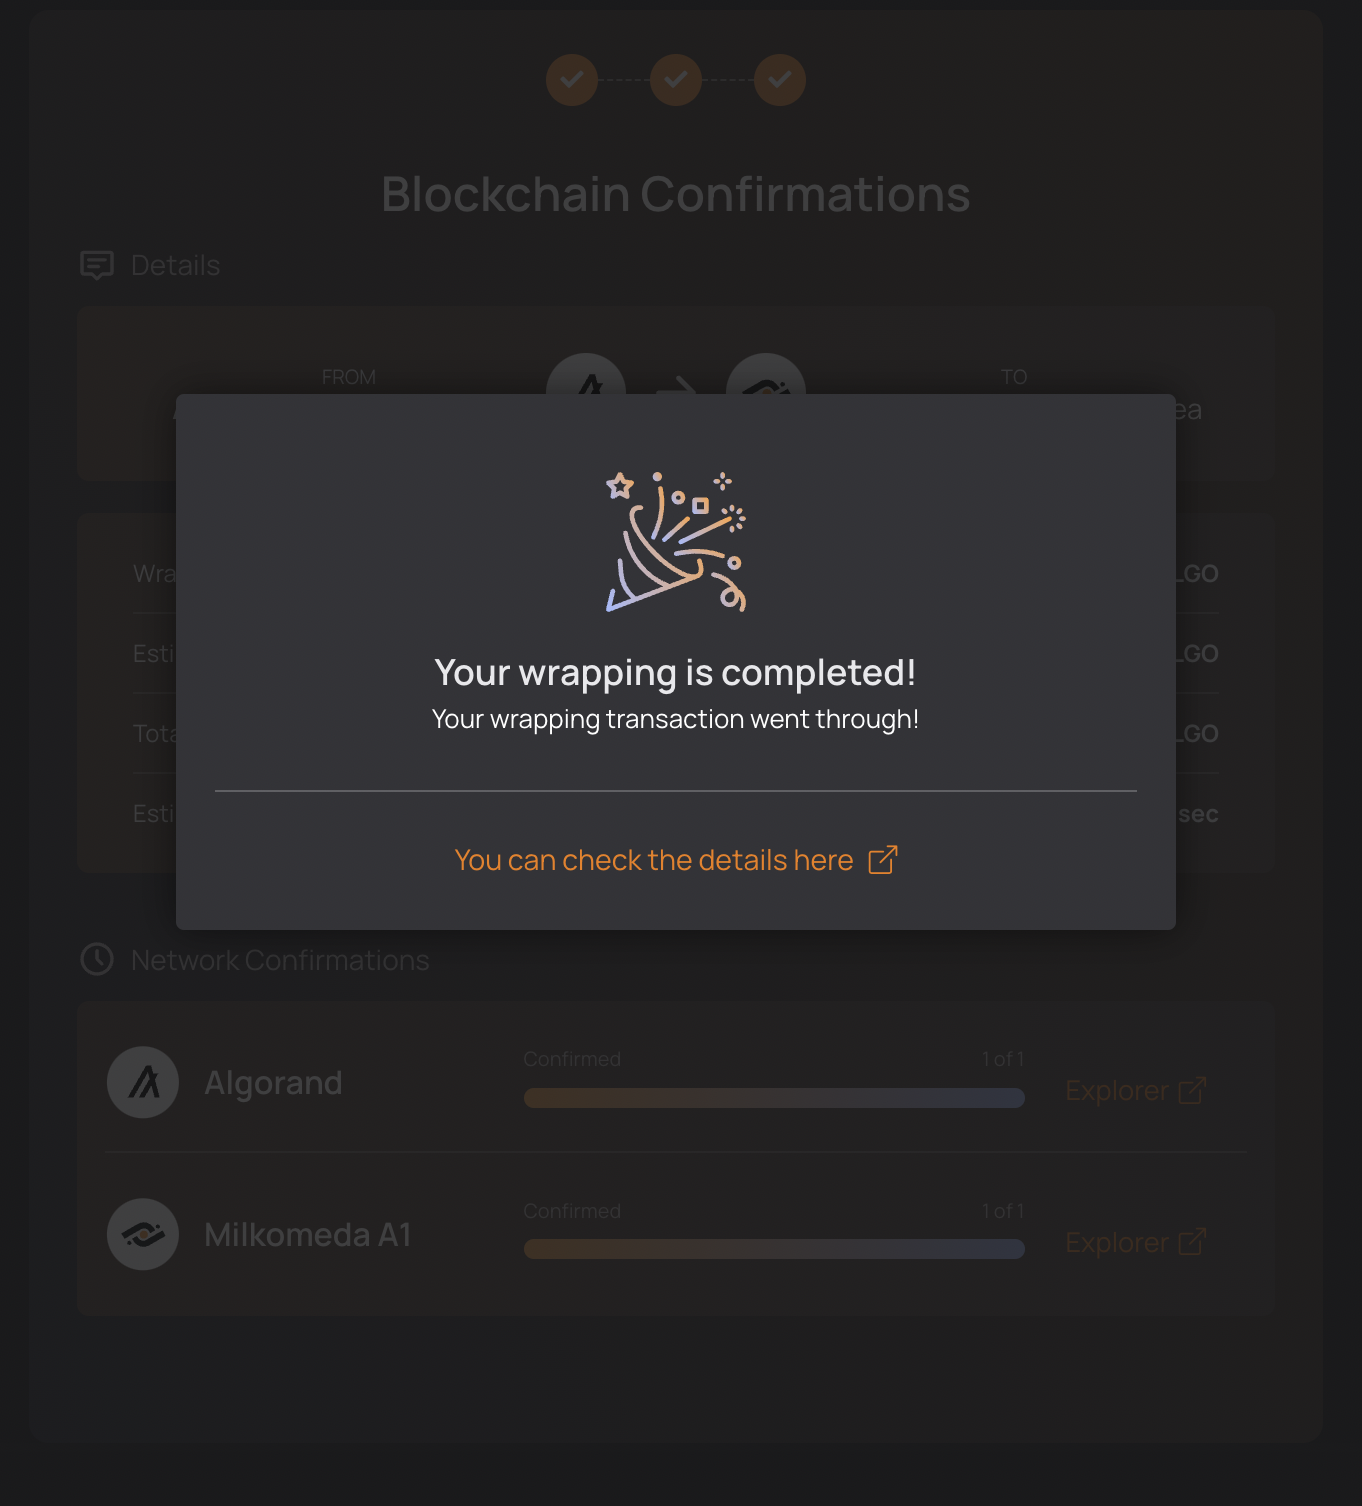
Congratulations! You just wrapped your tokens onto on of the first rollups outside of the Ethereum ecosystem!
Now that we have successfully wrapped Test ALGO into MilkTALGO, for use on the Milkomeda A1 Algorand Rollup Testnet, let's see how to move assets from Milkomeda A1 Rollup to Algorand.
Unwrapping Assets
To move assets from the Milkomeda Algorand Rollup back to Algorand (in a process called unwrapping), first go to Milkomeda Bridge dApp. Follow the steps below to unwrap milkTALGO and to receive ALGO in your Algorand wallet.
Go to the Milkomeda A1 bridge dApp at https://algorand-bridge-dev.milkomeda.com/. To start unwrapping your assets, choose the Milkomeda to Algorand option from the "Network Origin" dropdown menu. Then select the token you want to unwrap (in our example, we will use the milkTALGO token) from "Select Token" dropdown menu.
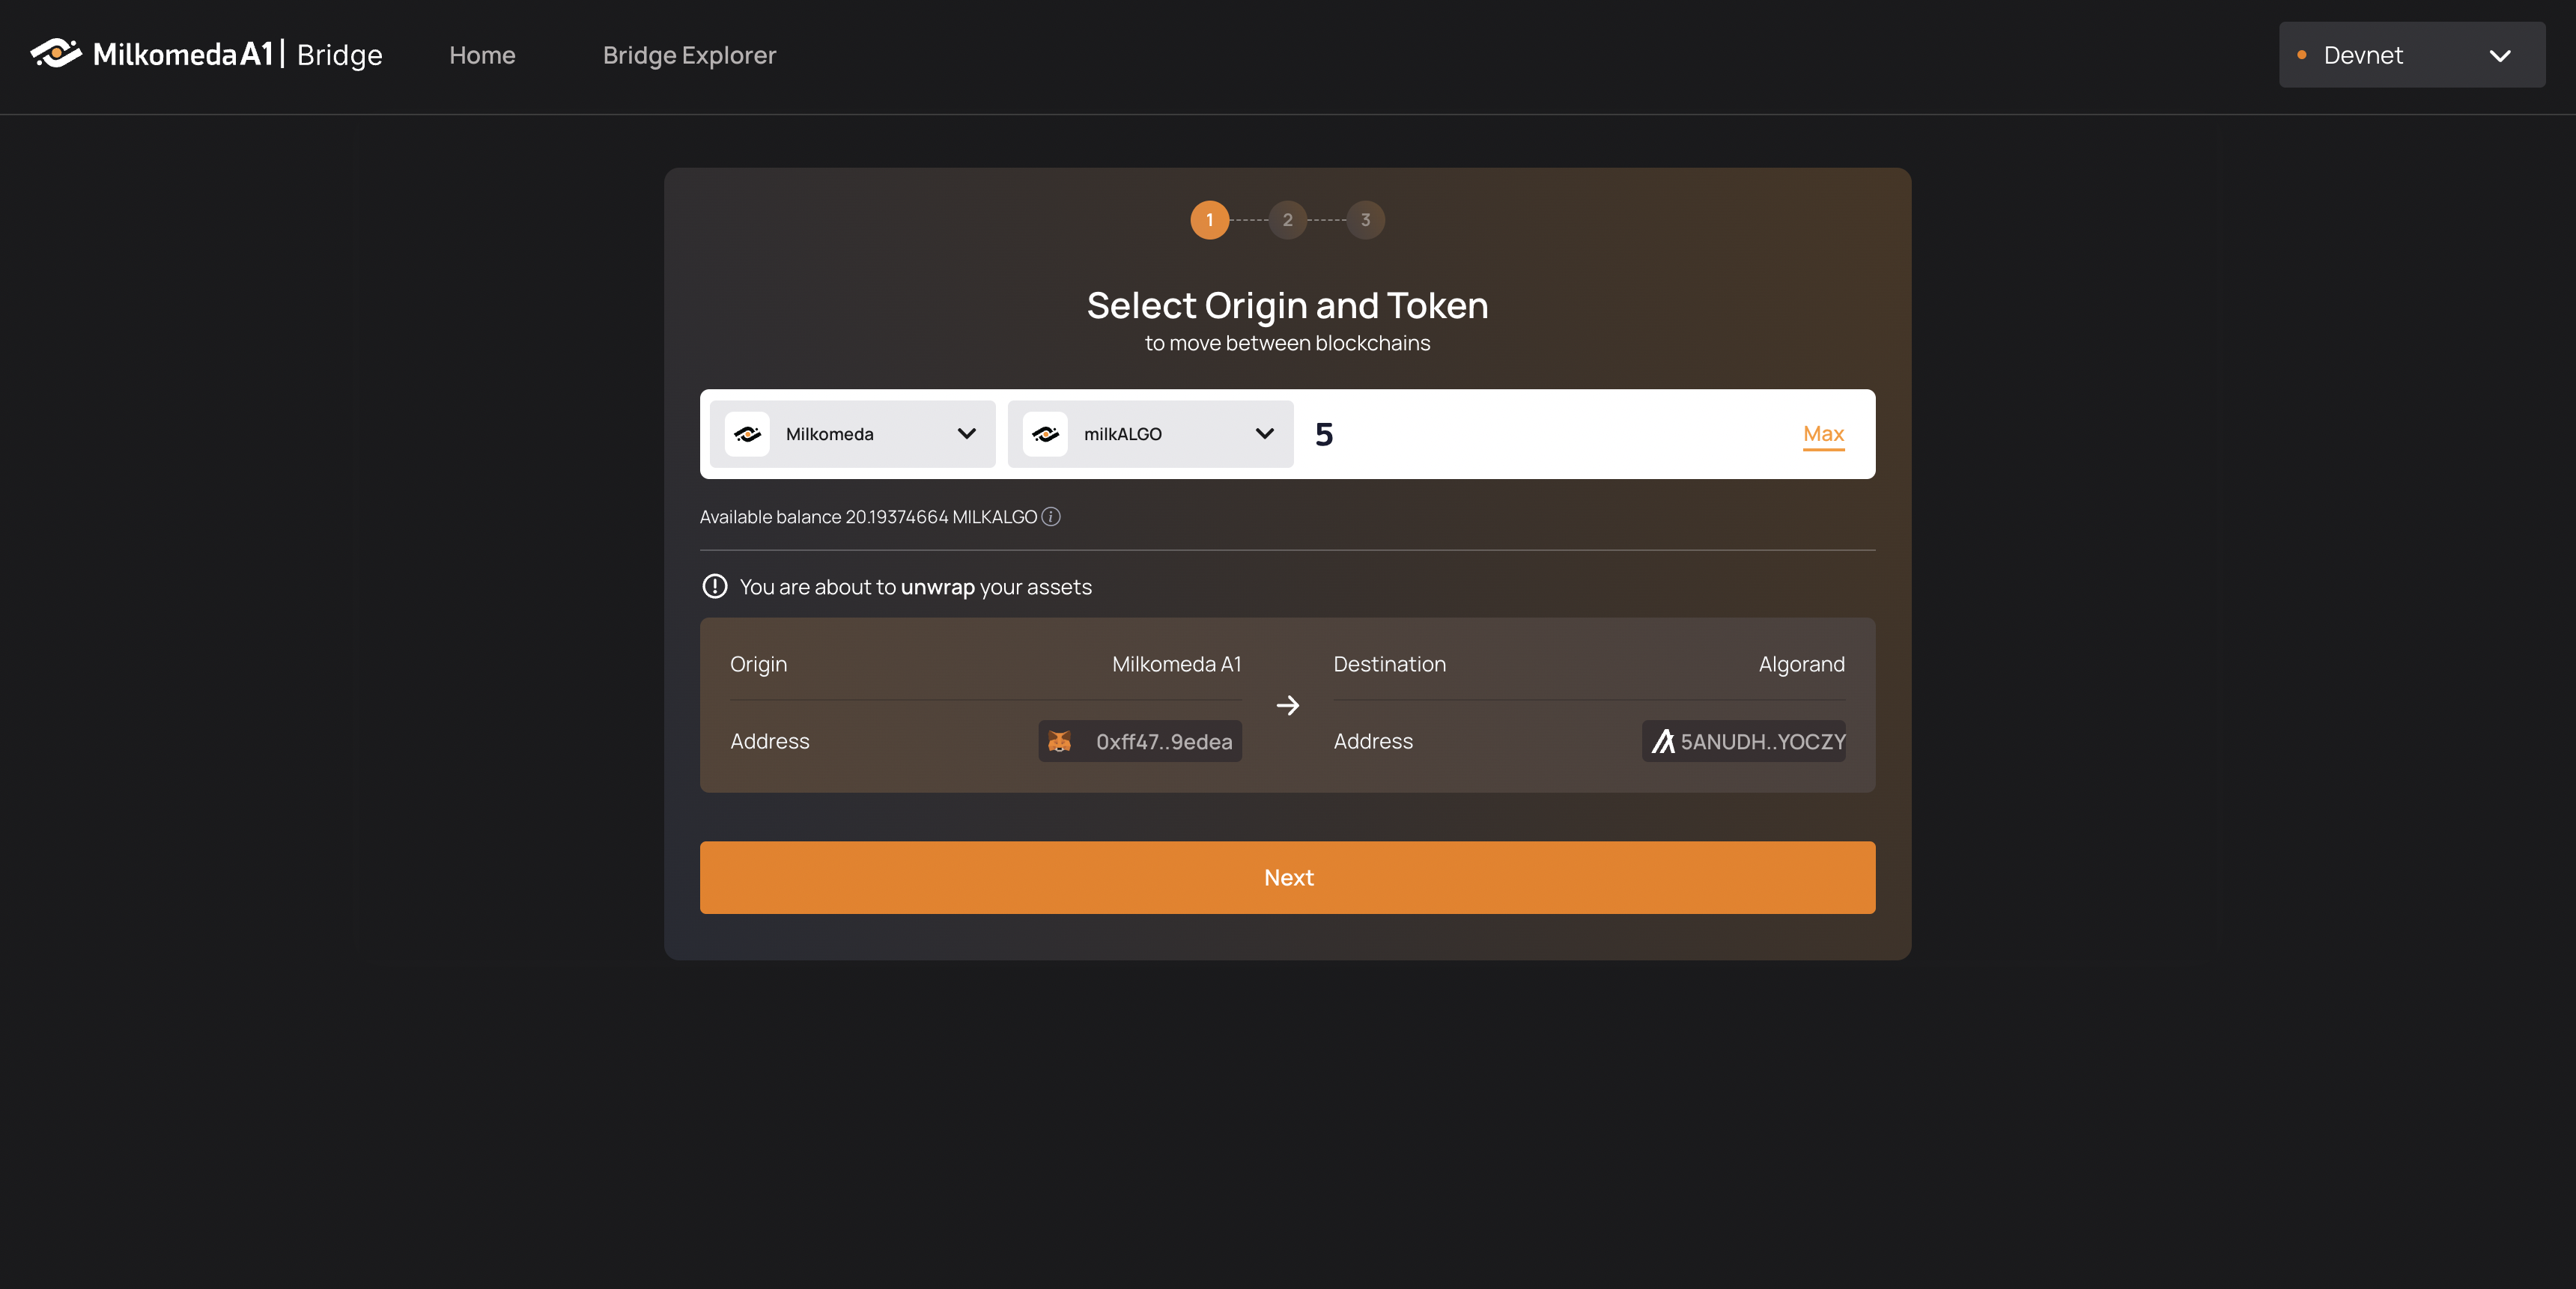 The next step is be to log in to your MetaMask and MyAlgo wallets.
Click “Connect Wallet” on the Origin side and your Metamask wallet will ask you to confirm that you want to switch networks (if you are not already connected to it) to the Milkomeda A1 network. Your available milkTALGO balance will then be displayed below the Select Token field.
Click “Connect Wallet” on the “Destination” side of the dApp and your MyAlgo wallet will require you to enter your password and confirm which account to connect to the dApp.
Enter how many milkTALGO you want to transfer back to the Algorand (if you want to send your whole balance click “Max” to have the bridge calculate the maximum amount you can send minus the transaction fee).
Click “Next” to view a transaction summary, complete with “Estimated Fees” and an “Estimated Wrapping Confirmation Time”.
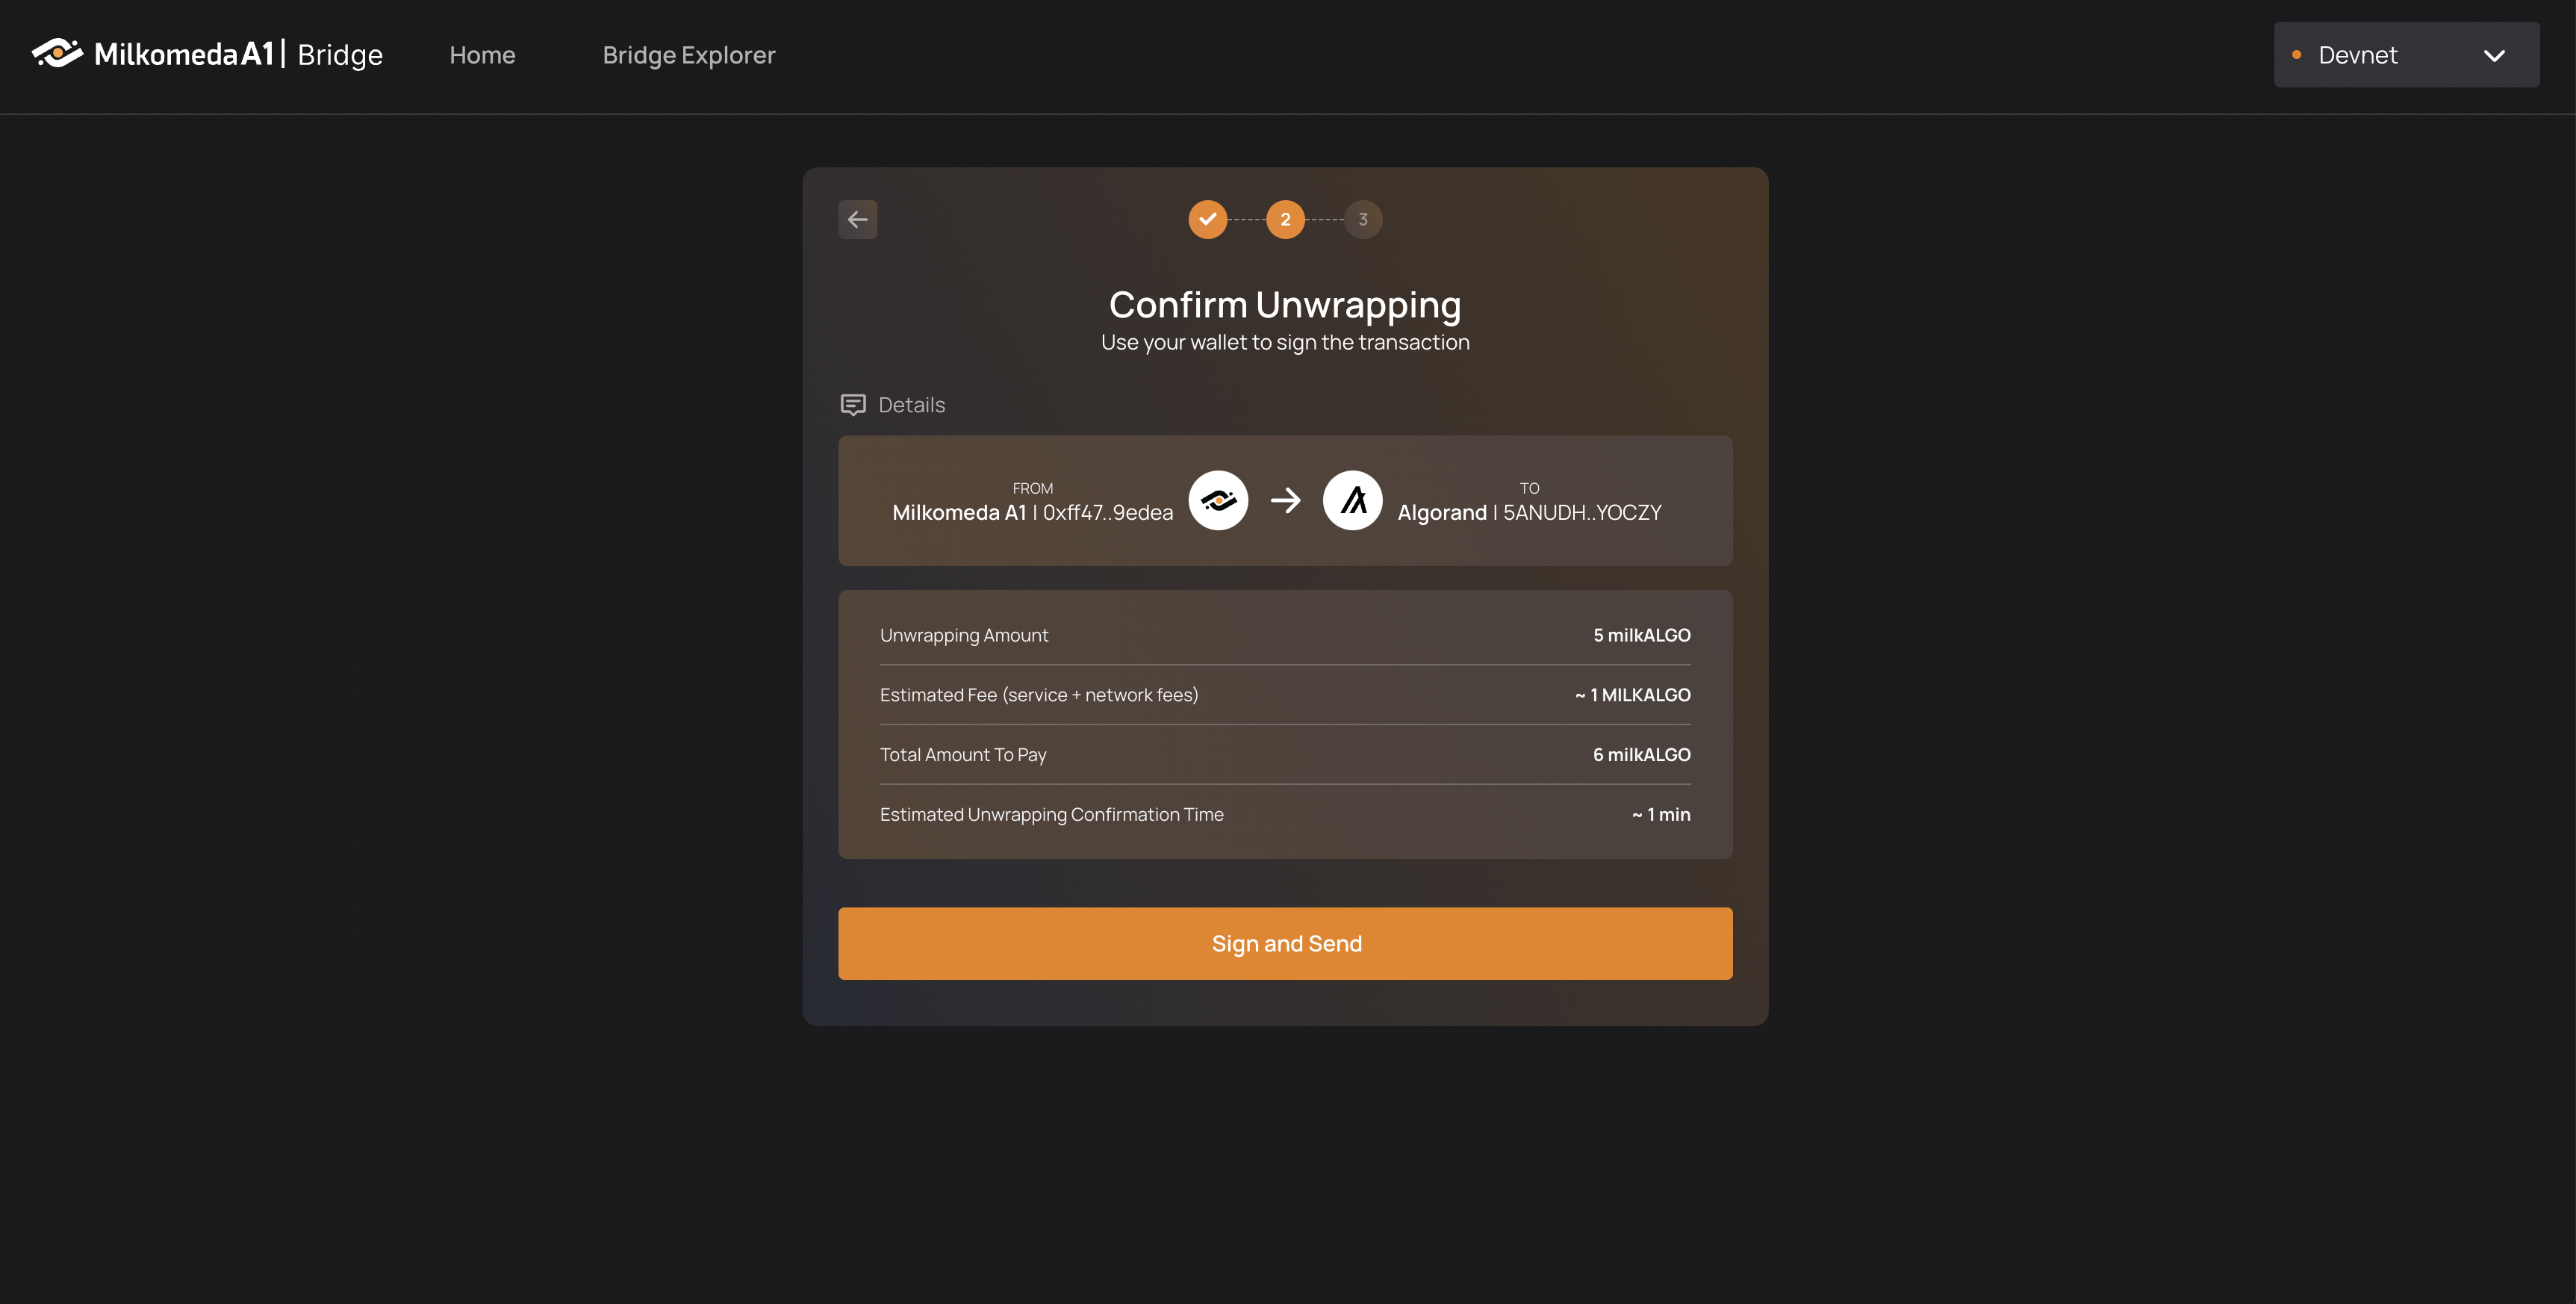
Click “Sign and Send”, confirm the transaction in yout Metamask wallet and then watch as your tokens get sent to the bridge, unwrapped, and sent to your MyAlgo wallet on Algorand! The process should take around 90 seconds to confirm.
Moving assets the other way (from the Layer 2 to Algorand) requires the user to interact with the bridge’s smart contract in order to request their unwrapping. The validators will then coordinate to build the transaction to release the assets from their custody on the mainchain. Each validator (at least the quorum) needs to provide the necessary signatures in order to validate the transaction on chain.
 Once the transaction is confirmed, the transferred tALGO should be visible in your Algorand wallet.
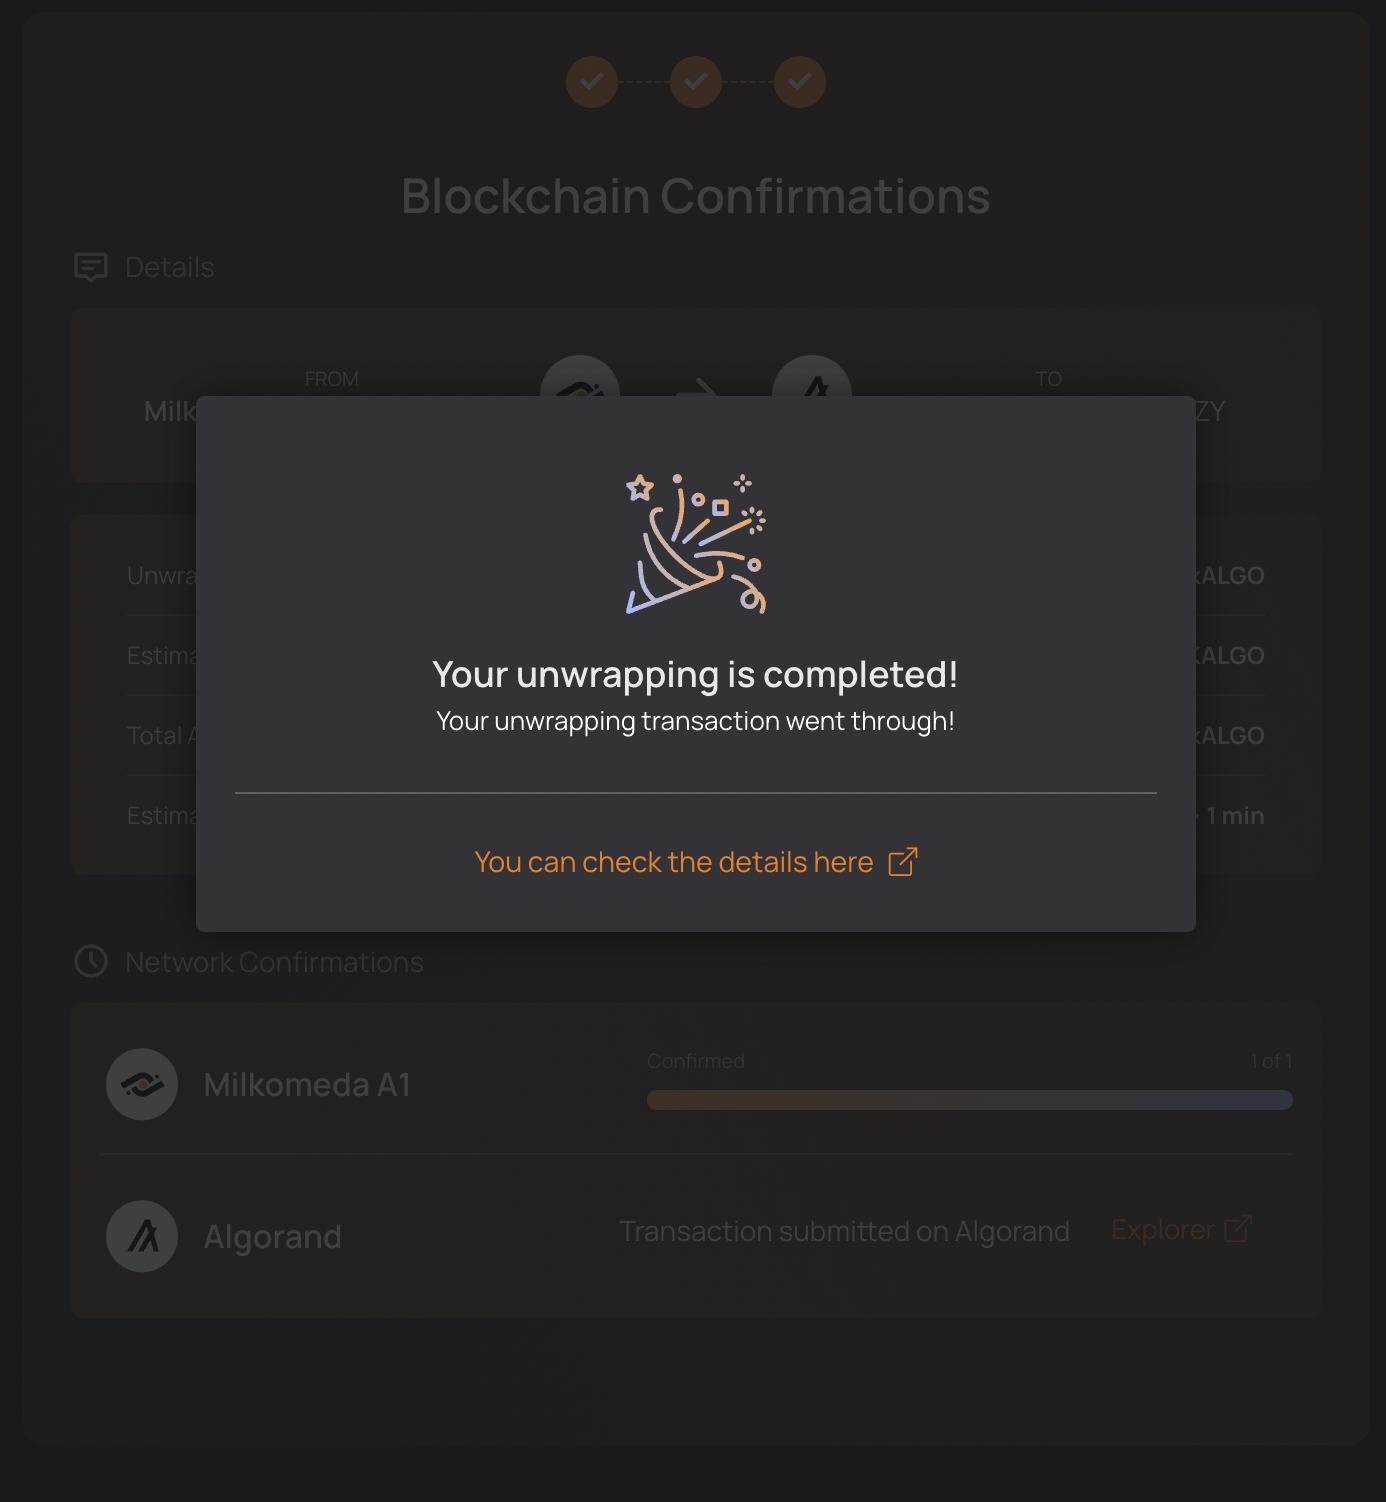
Congratulations! You’ve just unwrapped your tokens from the Milkomeda Algorand Rollup to Algorand!
Now that we have successfully unwrapped milkTALGO from the Milkomeda Algorand Rollup to the Algorand let’s talk about moving Algorand Standard Assets (ASAs) using the Milkomeda Rollup Bridge.
Algorand Standard Assets support
This section gives a brief introduction of the Algorand Standard Assets (ASAs) supported by the Milkomeda A1 Rollup Bridge and how to move ASAs (wrapping or unwrapping) between the Milkomeda A1 Rollup and the mainchain (Algorand). Before we go through the step-by-step instruction of how to wrap and unwrap ASAs using the Milkomeda A1 Bridge it’s important to understand what ASAs are.
Algorand Standard Assets (ASAs)
The Algorand Standard Assets (ASAs) are the on-chain assets supported by Algorand that ensures the same security, compatibility and speed as its native currency - Algo. ASAs can represent stablecoins, in-game currencies, loyalty points, etc. They can also represent single assets, like collectibles.
ASAs that are multiple assets of the same type can be called "fungible assets” - stablecoins, for example. Those that are unique are called non-fungible assets.
Learn more about ASAs: https://developer.algorand.org/docs/get-details/asa/
Now let's go over how to add an Algorand Standard Asset to a native Algorand Wallet so you can then move it using the Milkomeda A1 Bridge.
How to add an ASA to an Algorand Wallet
To be able to receive any ASA you first need to opt-in your account for the asset. Any account can receive Algorand Standard Assets, but a potential recipient of a specific ASA must first opt-in to the asset so that the account holder cannot be sent assets without professing a prior desire to receive that asset. "Opting In" to an asset is simply an asset transfer of 0 to and from the opting-in account. In this process you are adding a specific asset to your account before transferring it.
A Step-By-Step Guide to opt EURe into Your MyAlgo Wallet
Open your MyAlgo wallet.
Press the "Add Asset" button on the right, as highlighted in the image below.

- Input the ASA ID or its symbol (12400859 or EURE).
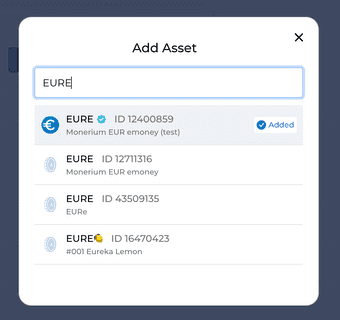
If you are having trouble finding this particular ASA make sure that your Wallet is connected to the Algorand testnet (in the upper right corner).
- Wait until EURe with a value of 0 appears in the list of assets in your account.
Now, your account can receive EURe from the testnet dispenser!
How to get testnet EURe
For the purpose of this tutorial we will only focus on testnet Euros, which is the default ASA available from the official Algorand Testnet Dispenser.
Go through the steps below to acquire your first testnet EURes.
Select "Testnet Euros" from the drop-down list, as shown in the image below.

Paste your Algorand wallet address.
Complete the required anti-bot verification.
Click "Dispense" button to receive your Testnet Euros.
Once you've received your testnet Euros you are ready to start interacting with the Milkomeda | Algorand A1 Rollup Bridge. How cool is that!
Wrapping Algorand Standard Assets with the Milkomeda Bridge
Go to the Milkomeda A1 Bridge dApp at https://algorand-bridge-dev.milkomeda.com/. To start wrapping your assets, choose Algorand to Milkomeda direction from the "Network Origin" dropdown menu. Then select the appropriate token (EURe) from the "Select Token" dropdown menu.
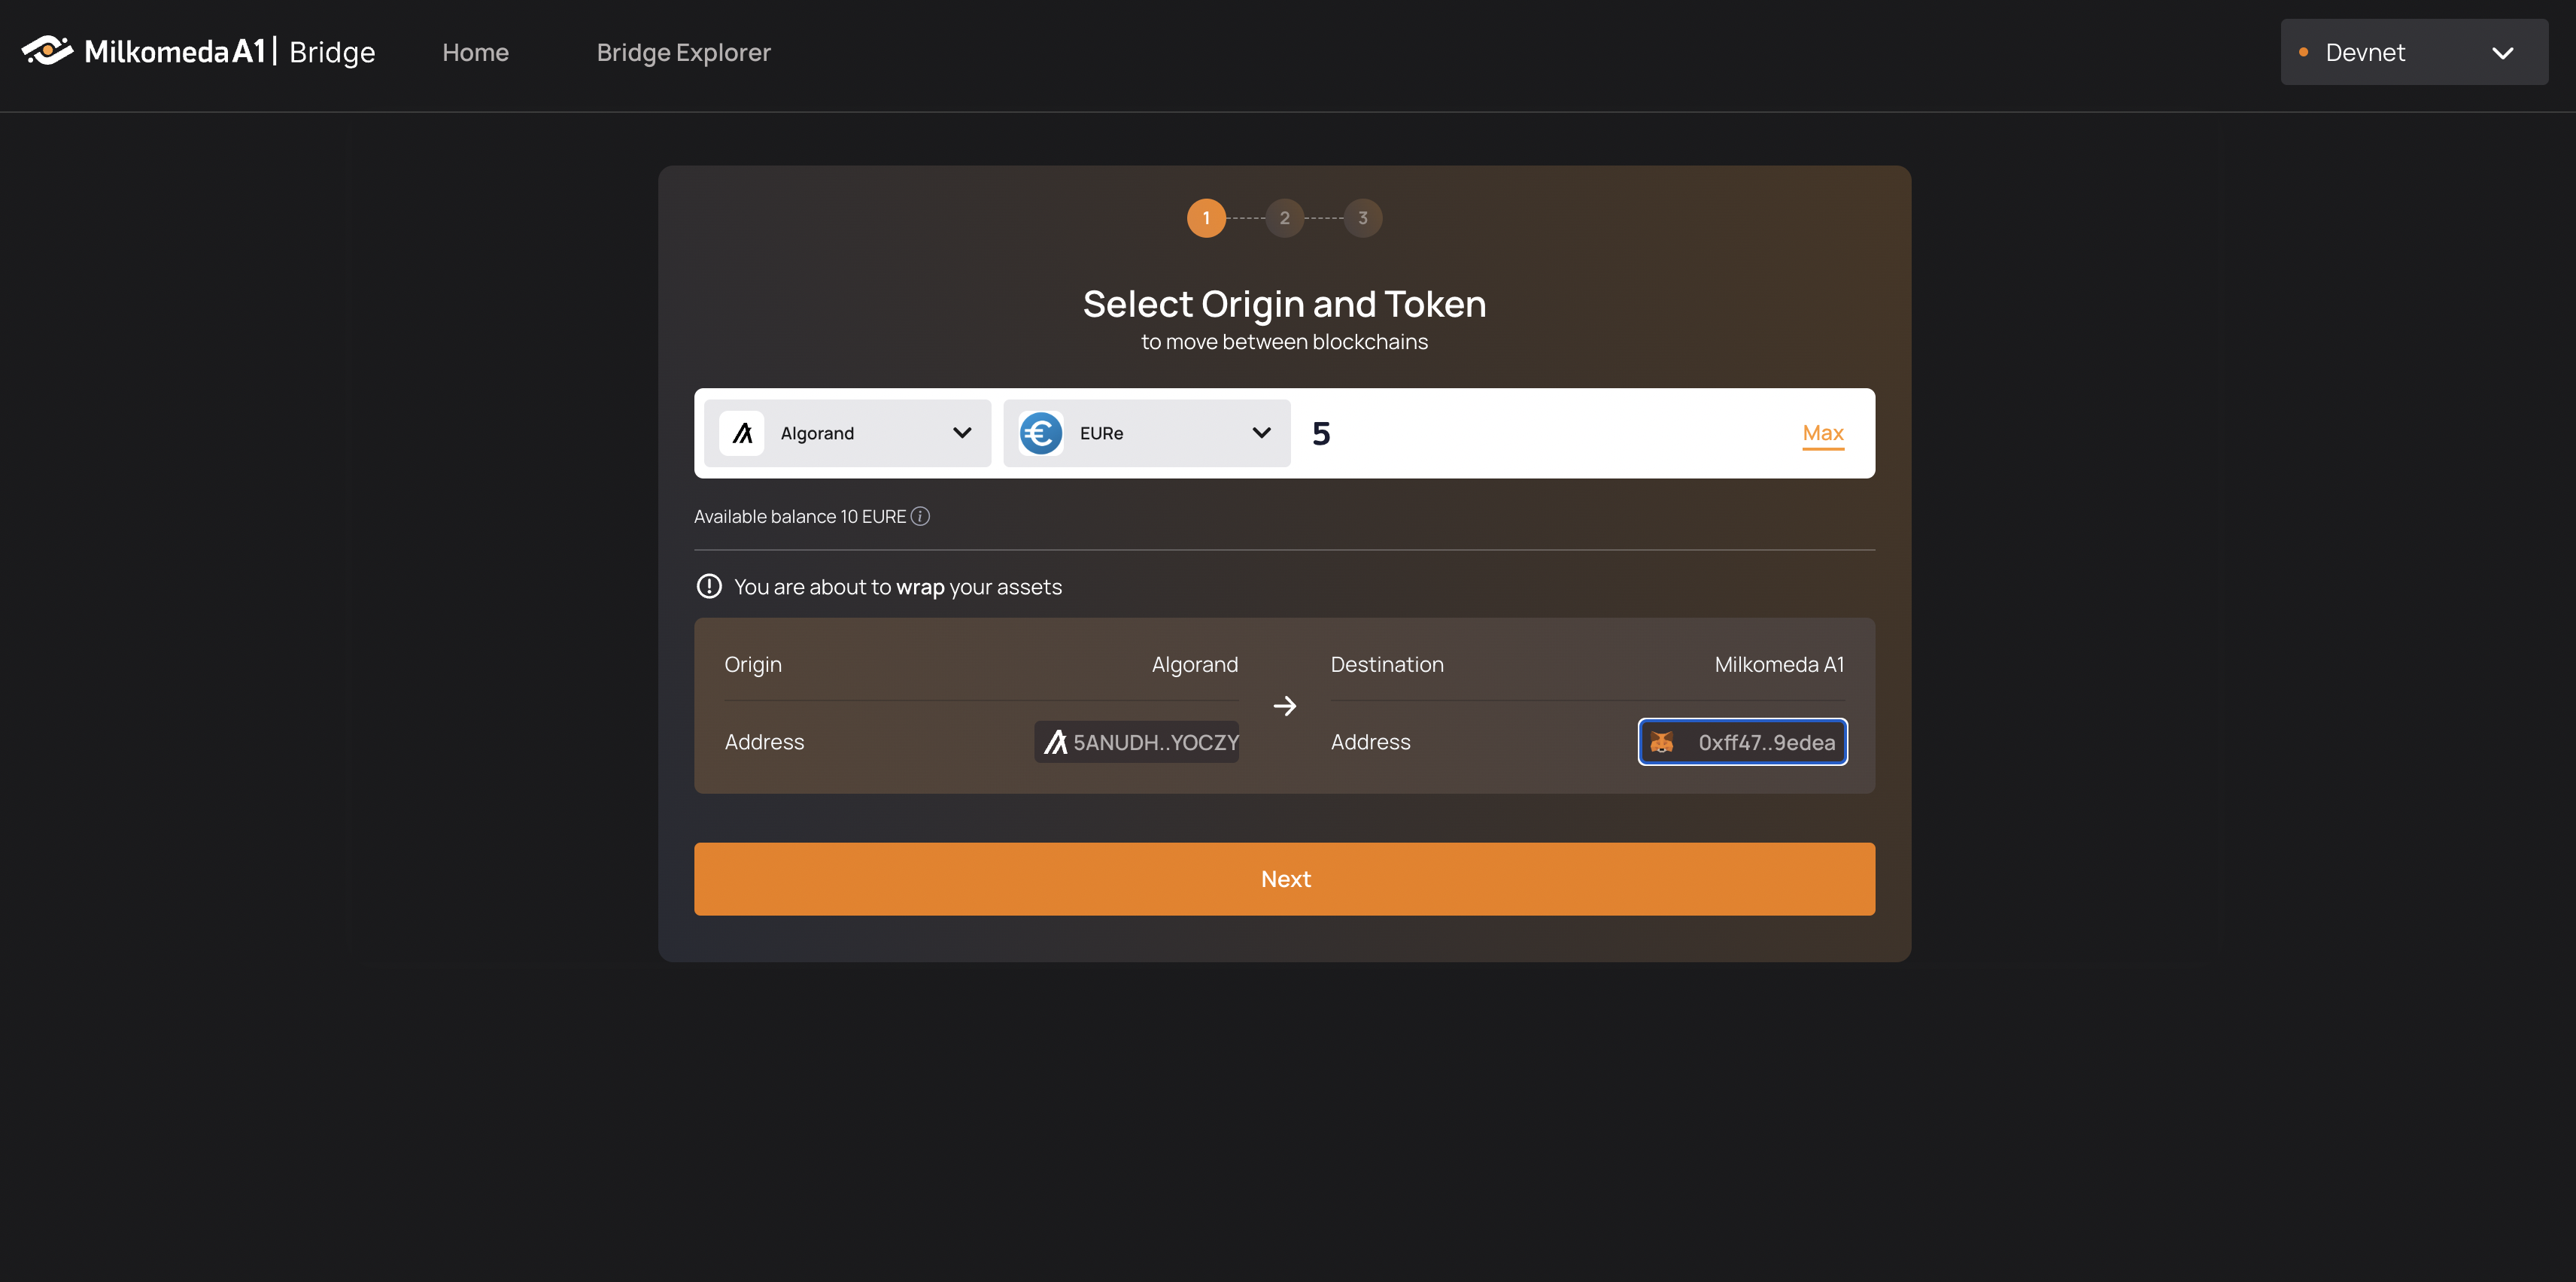
Remember, you must have a minimum amount of ALGO tokens in your Algorand wallet to move EURe as it is used to pay the transaction fee on the mainchain.
Enter how many test EURe you want to transfer to the A1 rollup.
Click “Next” to view a transaction summary, complete with “Estimated Fees” and an “Estimated Wrapping Confirmation Time”.
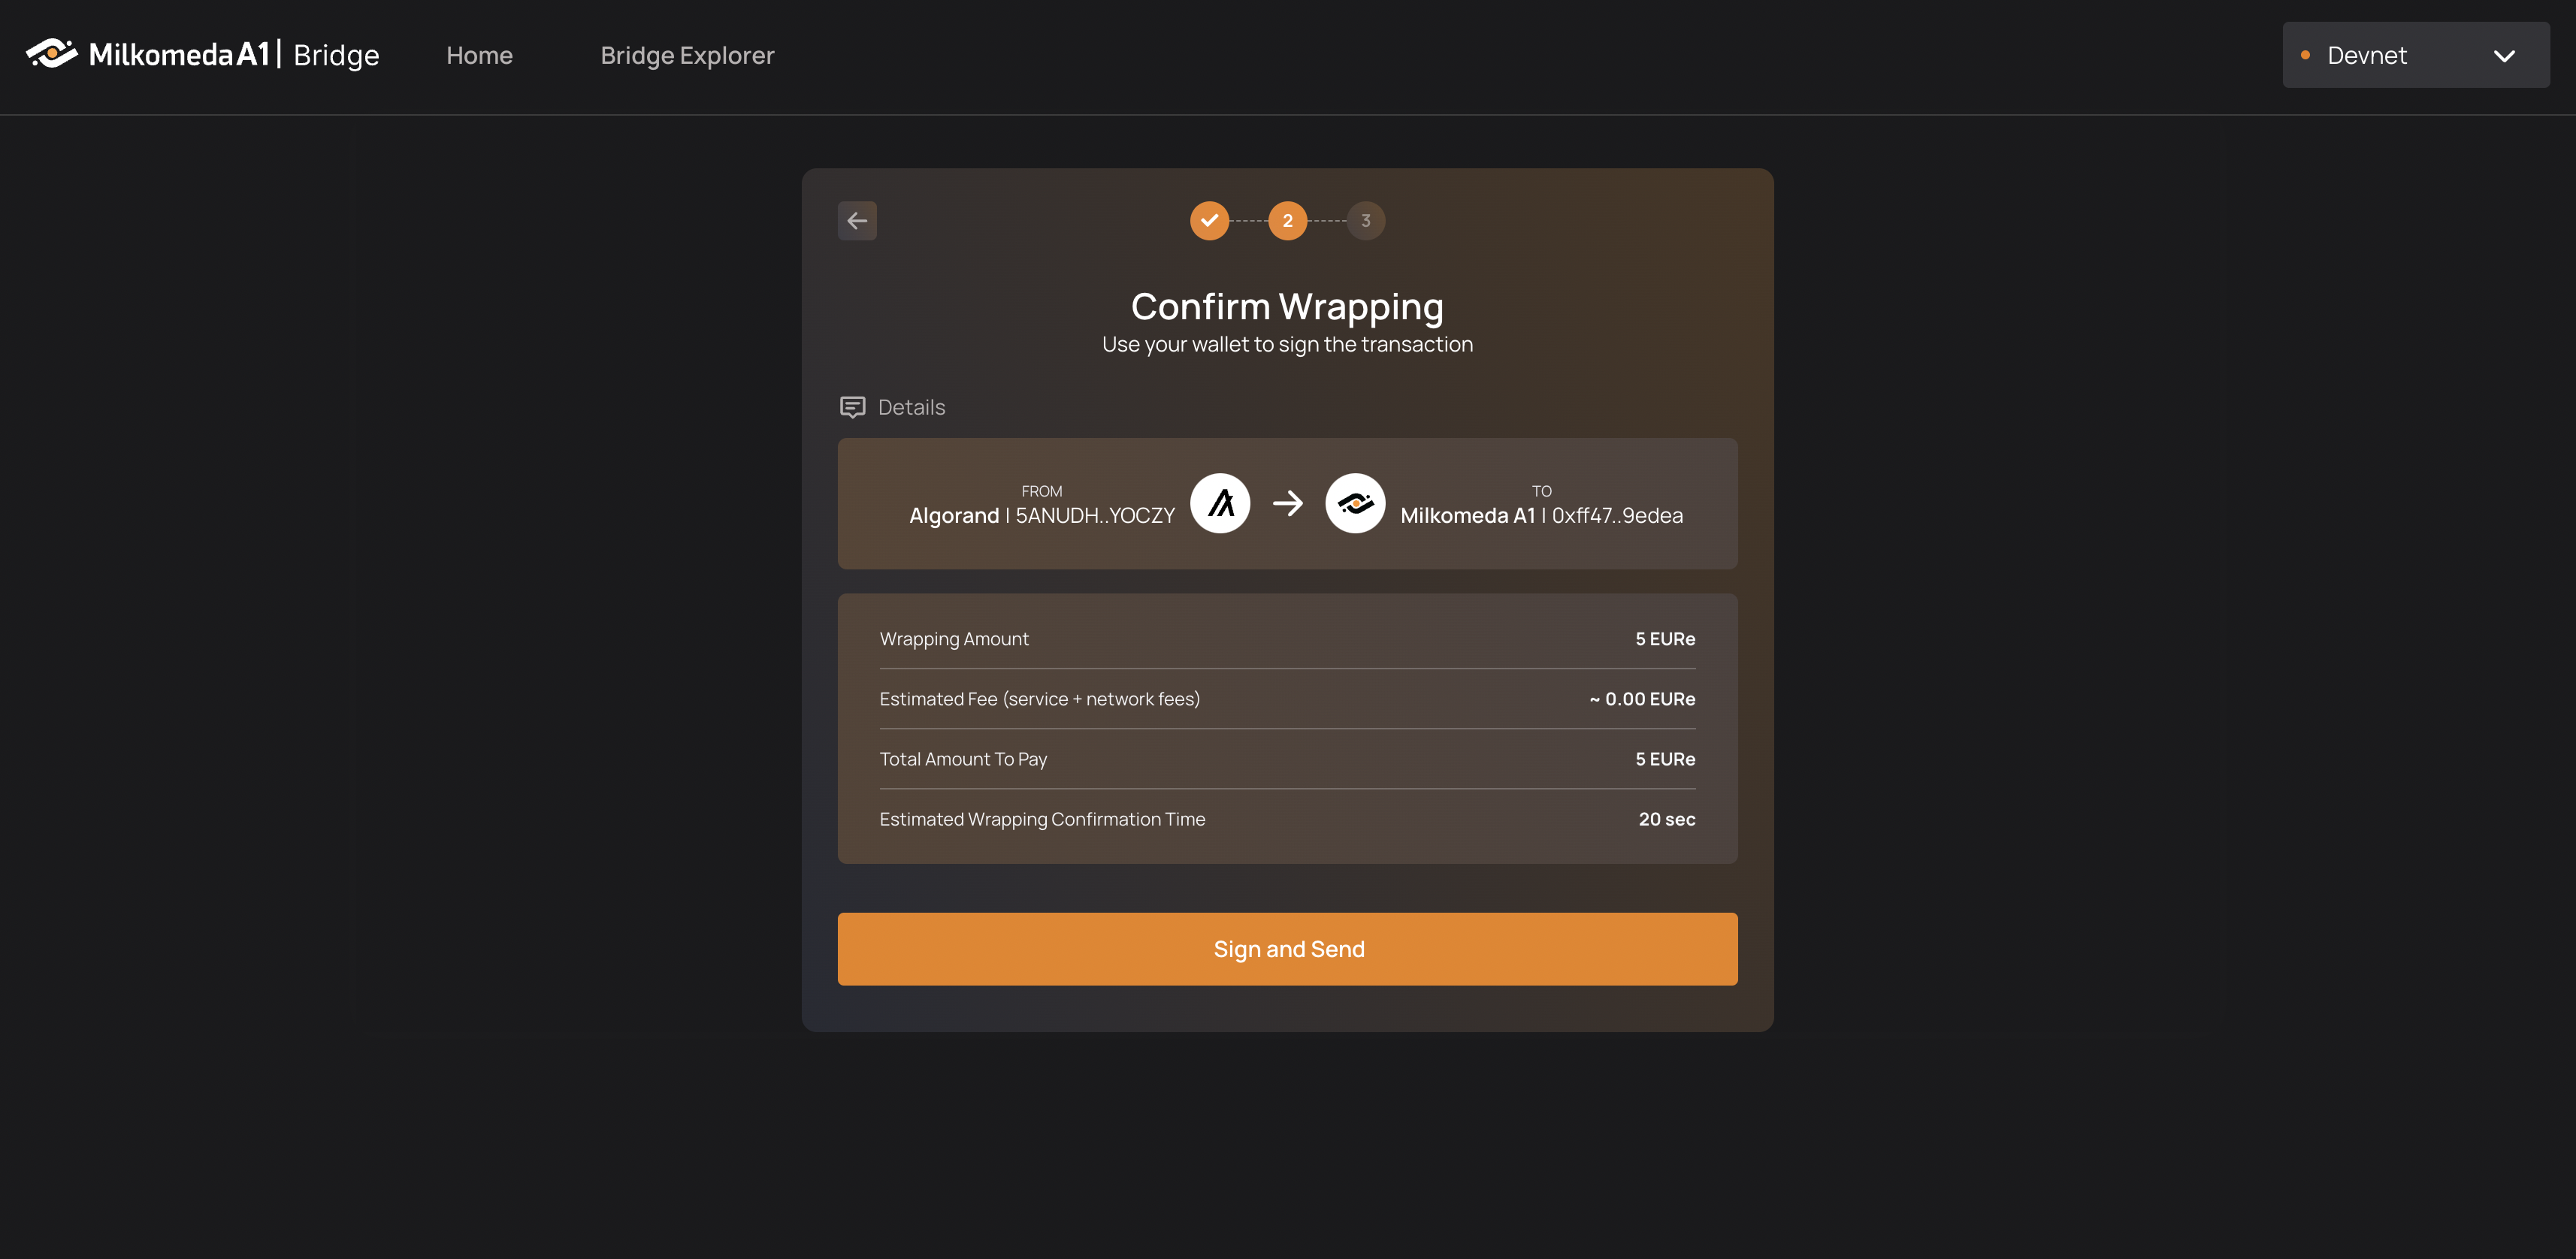
Click “Sign and Send”, enter your MyAlgo wallet password, confirm the transaction, and watch as your tokens get sent to the Bridge, wrapped, and sent to your MetaMask wallet on the Milkomeda Algorand A1 Rollup!
The transfer only requires a total of 2 confirmations, which should take approximately 20 seconds (4.5 seconds for Algorand and around 14 seconds for the batch of the Rollup).
You can now watch your transaction pass through the Bridge.
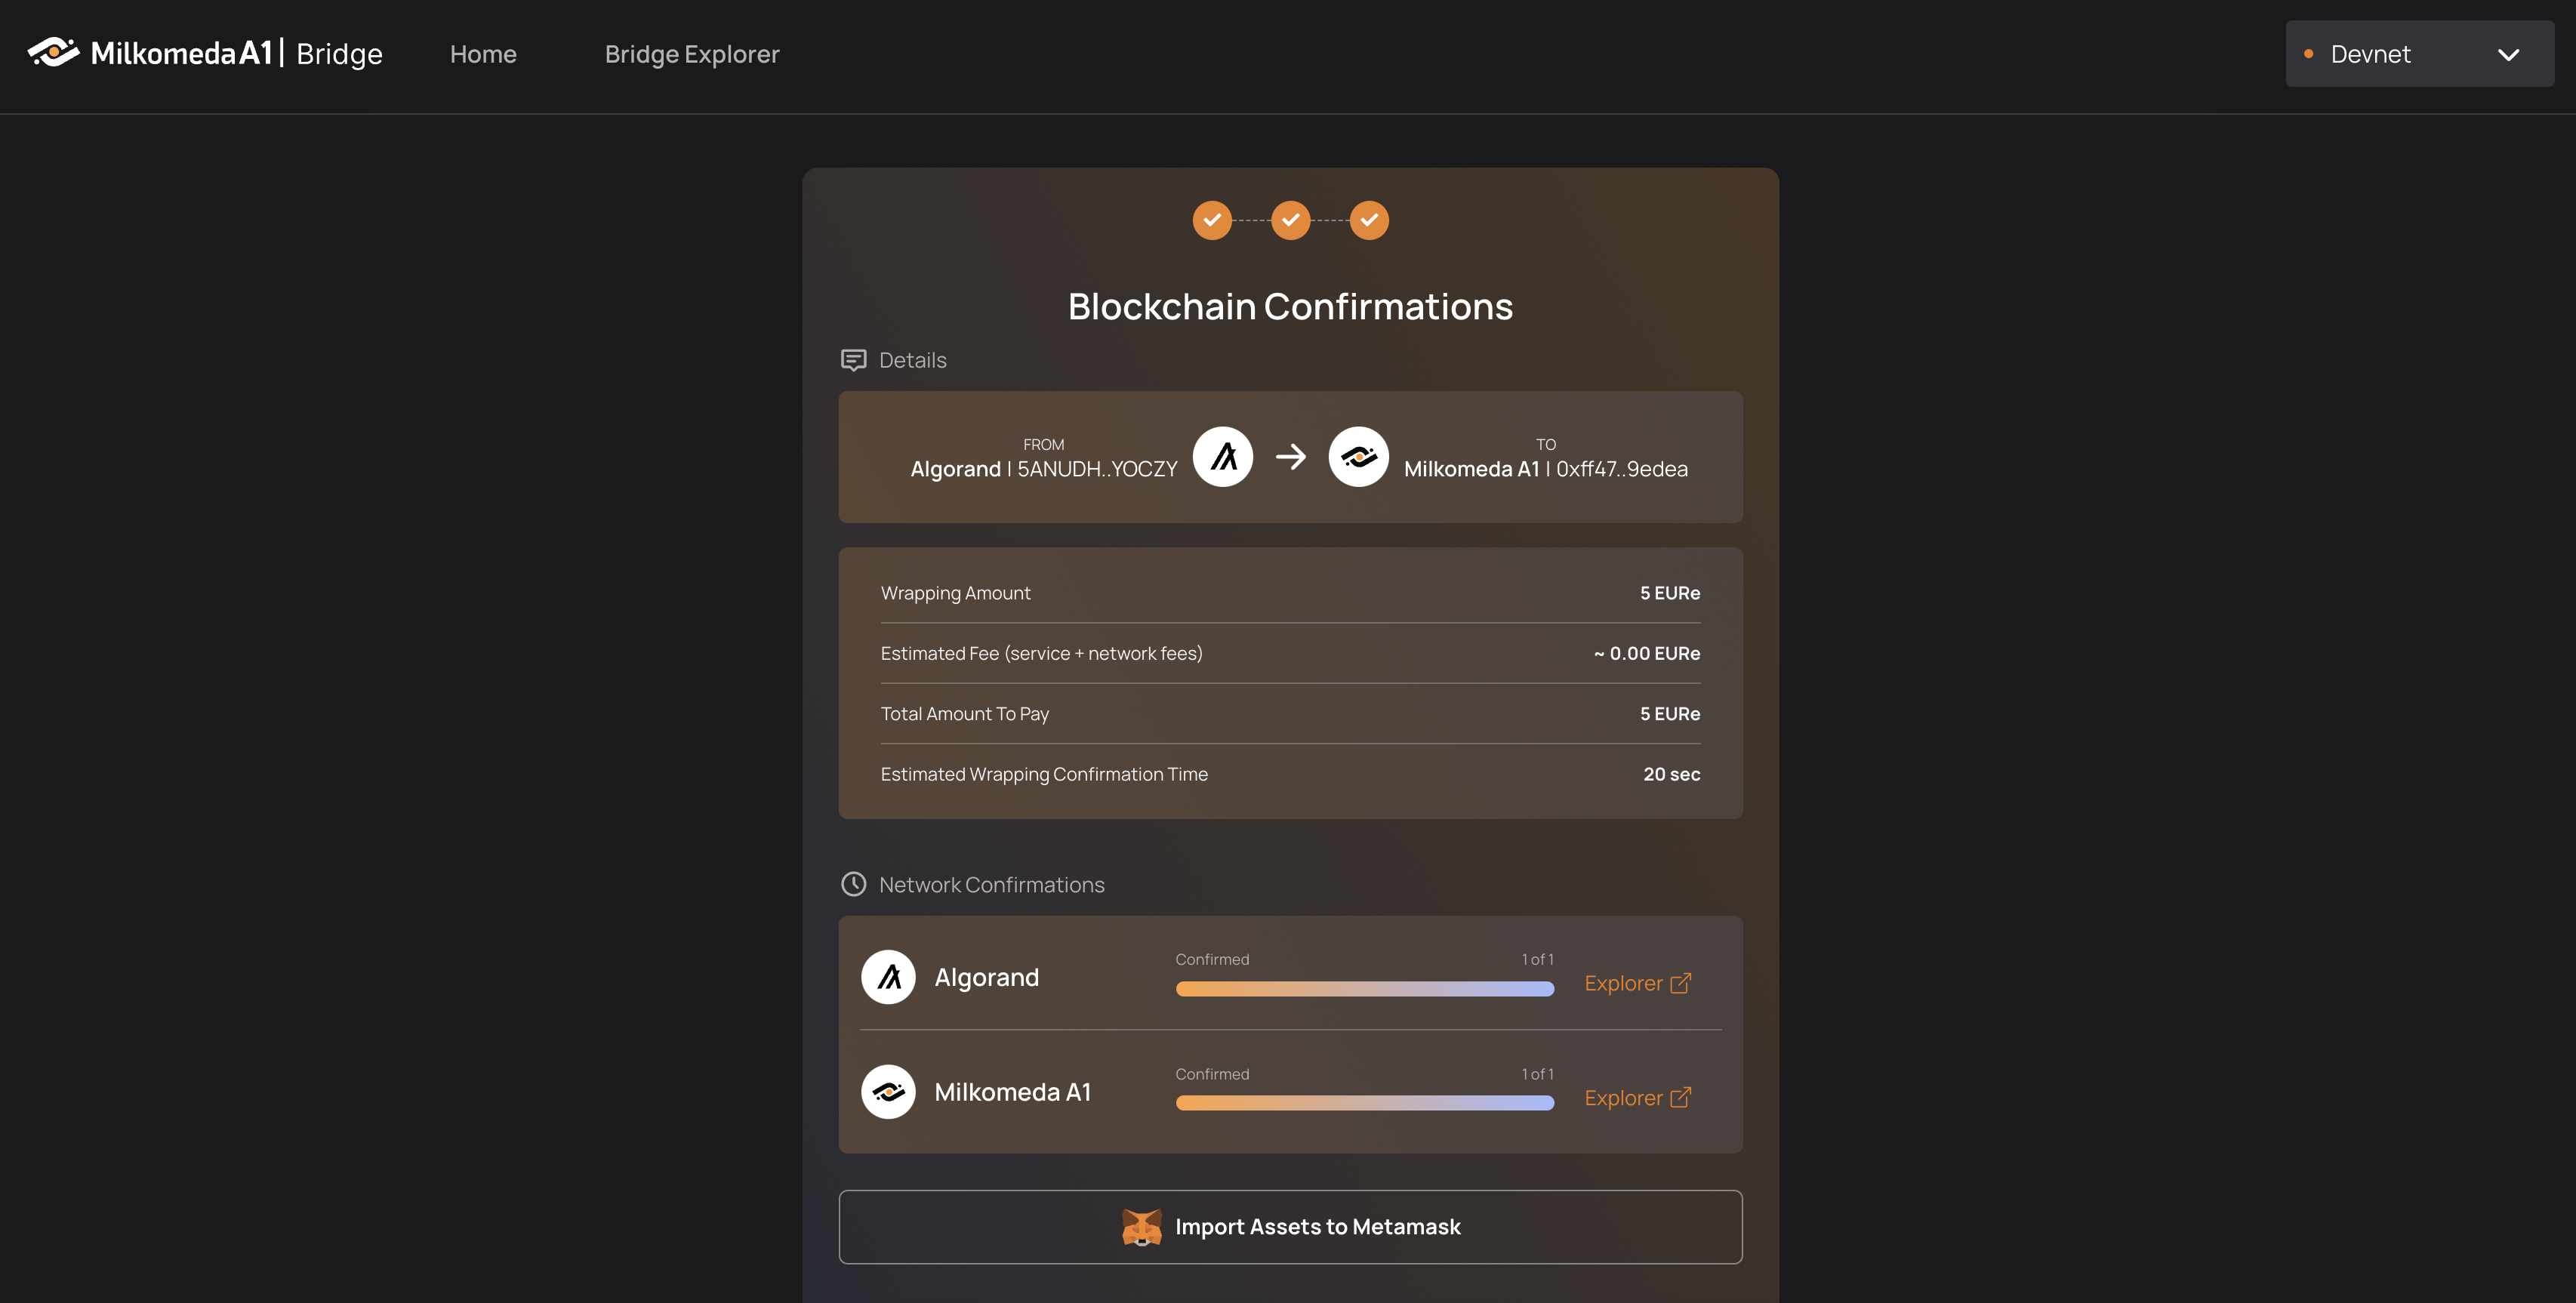
Once the transaction is confirmed you should add the ASA to your MetaMask wallet.
Use the "Import Assets to Metamask" button, found below the Network Confirmation section, to see the wrapped EURe in your Metamask Wallet. This button will bring up your MetaMask wallet and suggest that you add the wrapped ASA to your wallet, as shown in the image below.
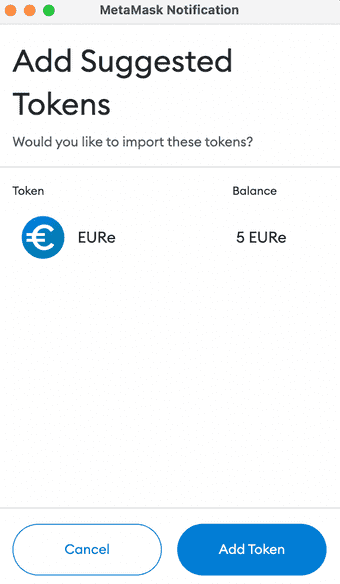
Click Add Token to be able to view your wrapped ASA in your MetaMask wallet.
Unwrapping Algorand Standard Assets with the Milkomeda Bridge
Go to the Milkomeda A1 Bridge dApp at https://algorand-bridge-dev.milkomeda.com/. To start unwrapping your assets, choose the Milkomeda to Algorand direction from the "Network Origin" dropdown menu. Then select the appropriate token (EURe) from the "Select Token" dropdown menu.
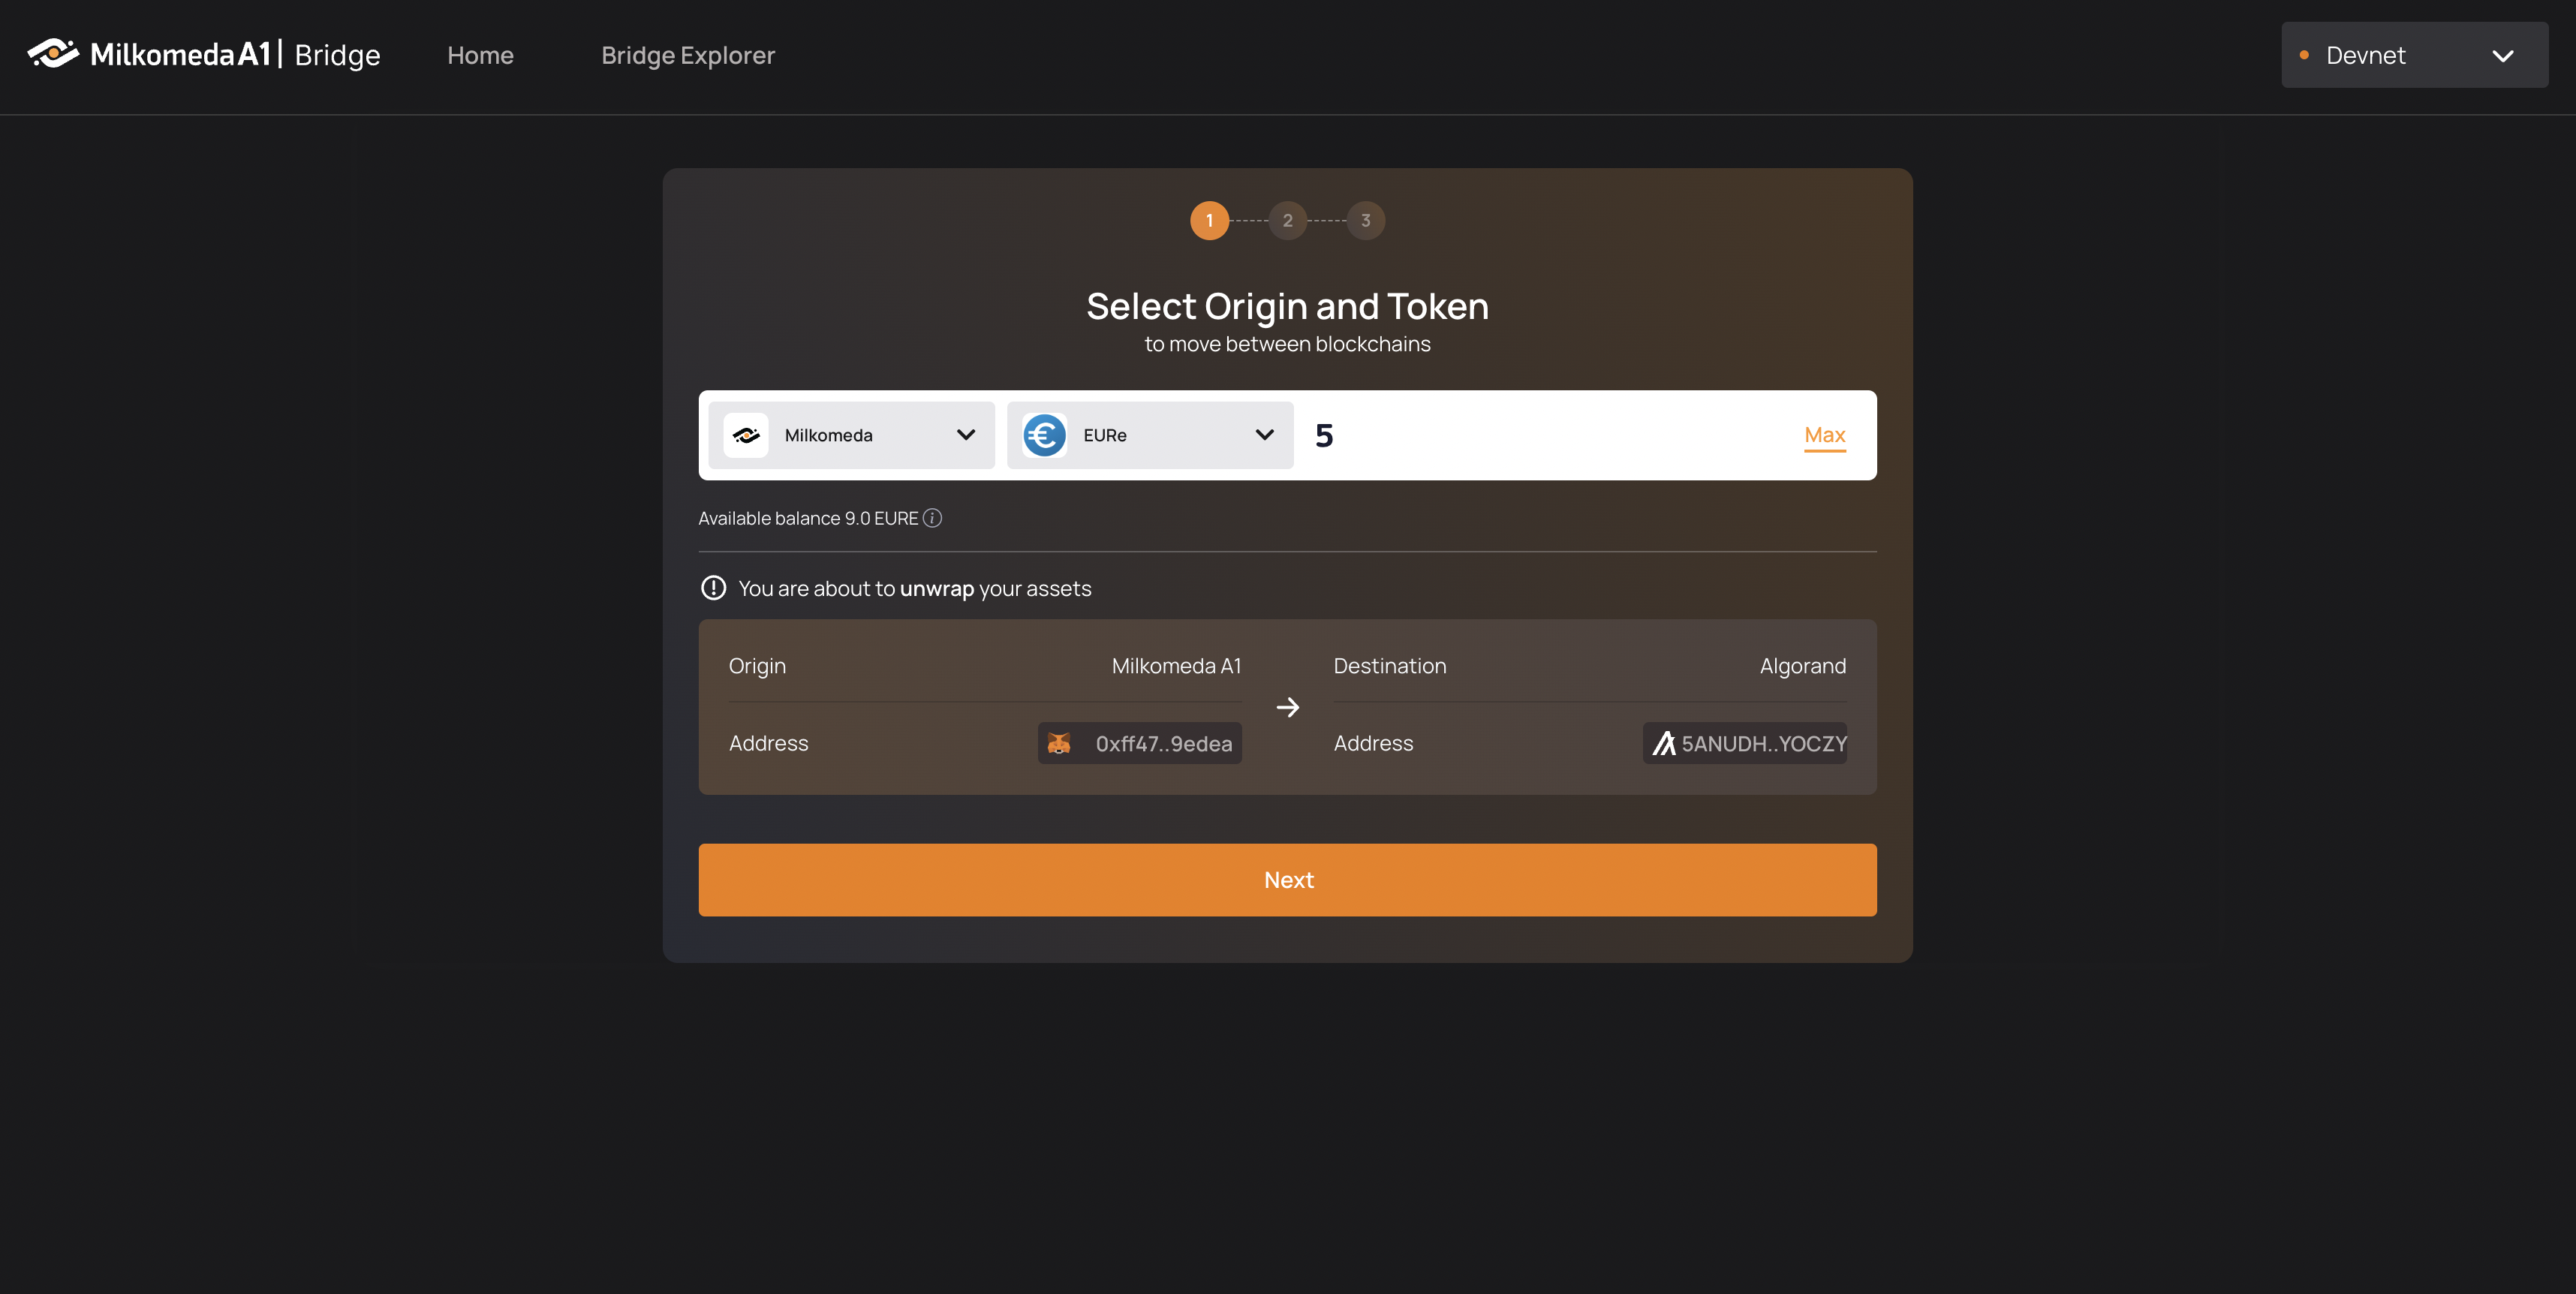
Enter how many test EURe you want to transfer back to Algorand. Click “Next” to view a transaction summary, complete with “Estimated Fees” and an “Estimated Wrapping Confirmation Time”.
Remember, you must have a minimum of 1 test milkALGO in your MetaMask wallet to move EURe as milkALGO is the currency in which Bridge fees are paid when unwrapping.
Click “Sign and Send”, and your MetaMask Wallet will show-up. Now you need to approve an ERC-20 allowance.
Giving ERC20 allowance simply means that the user grants another contract/address permission to transfer their ERC20 tokens. In other words, it allows other addresses to spend the token.
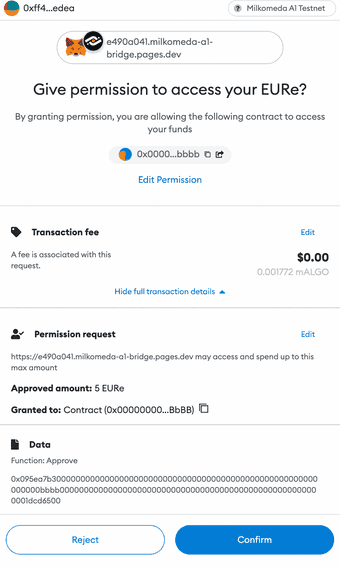
After ERC-20 Allowance is confirmed in MetaMask the dApp will wait to receive the allowance approval from the EVM.
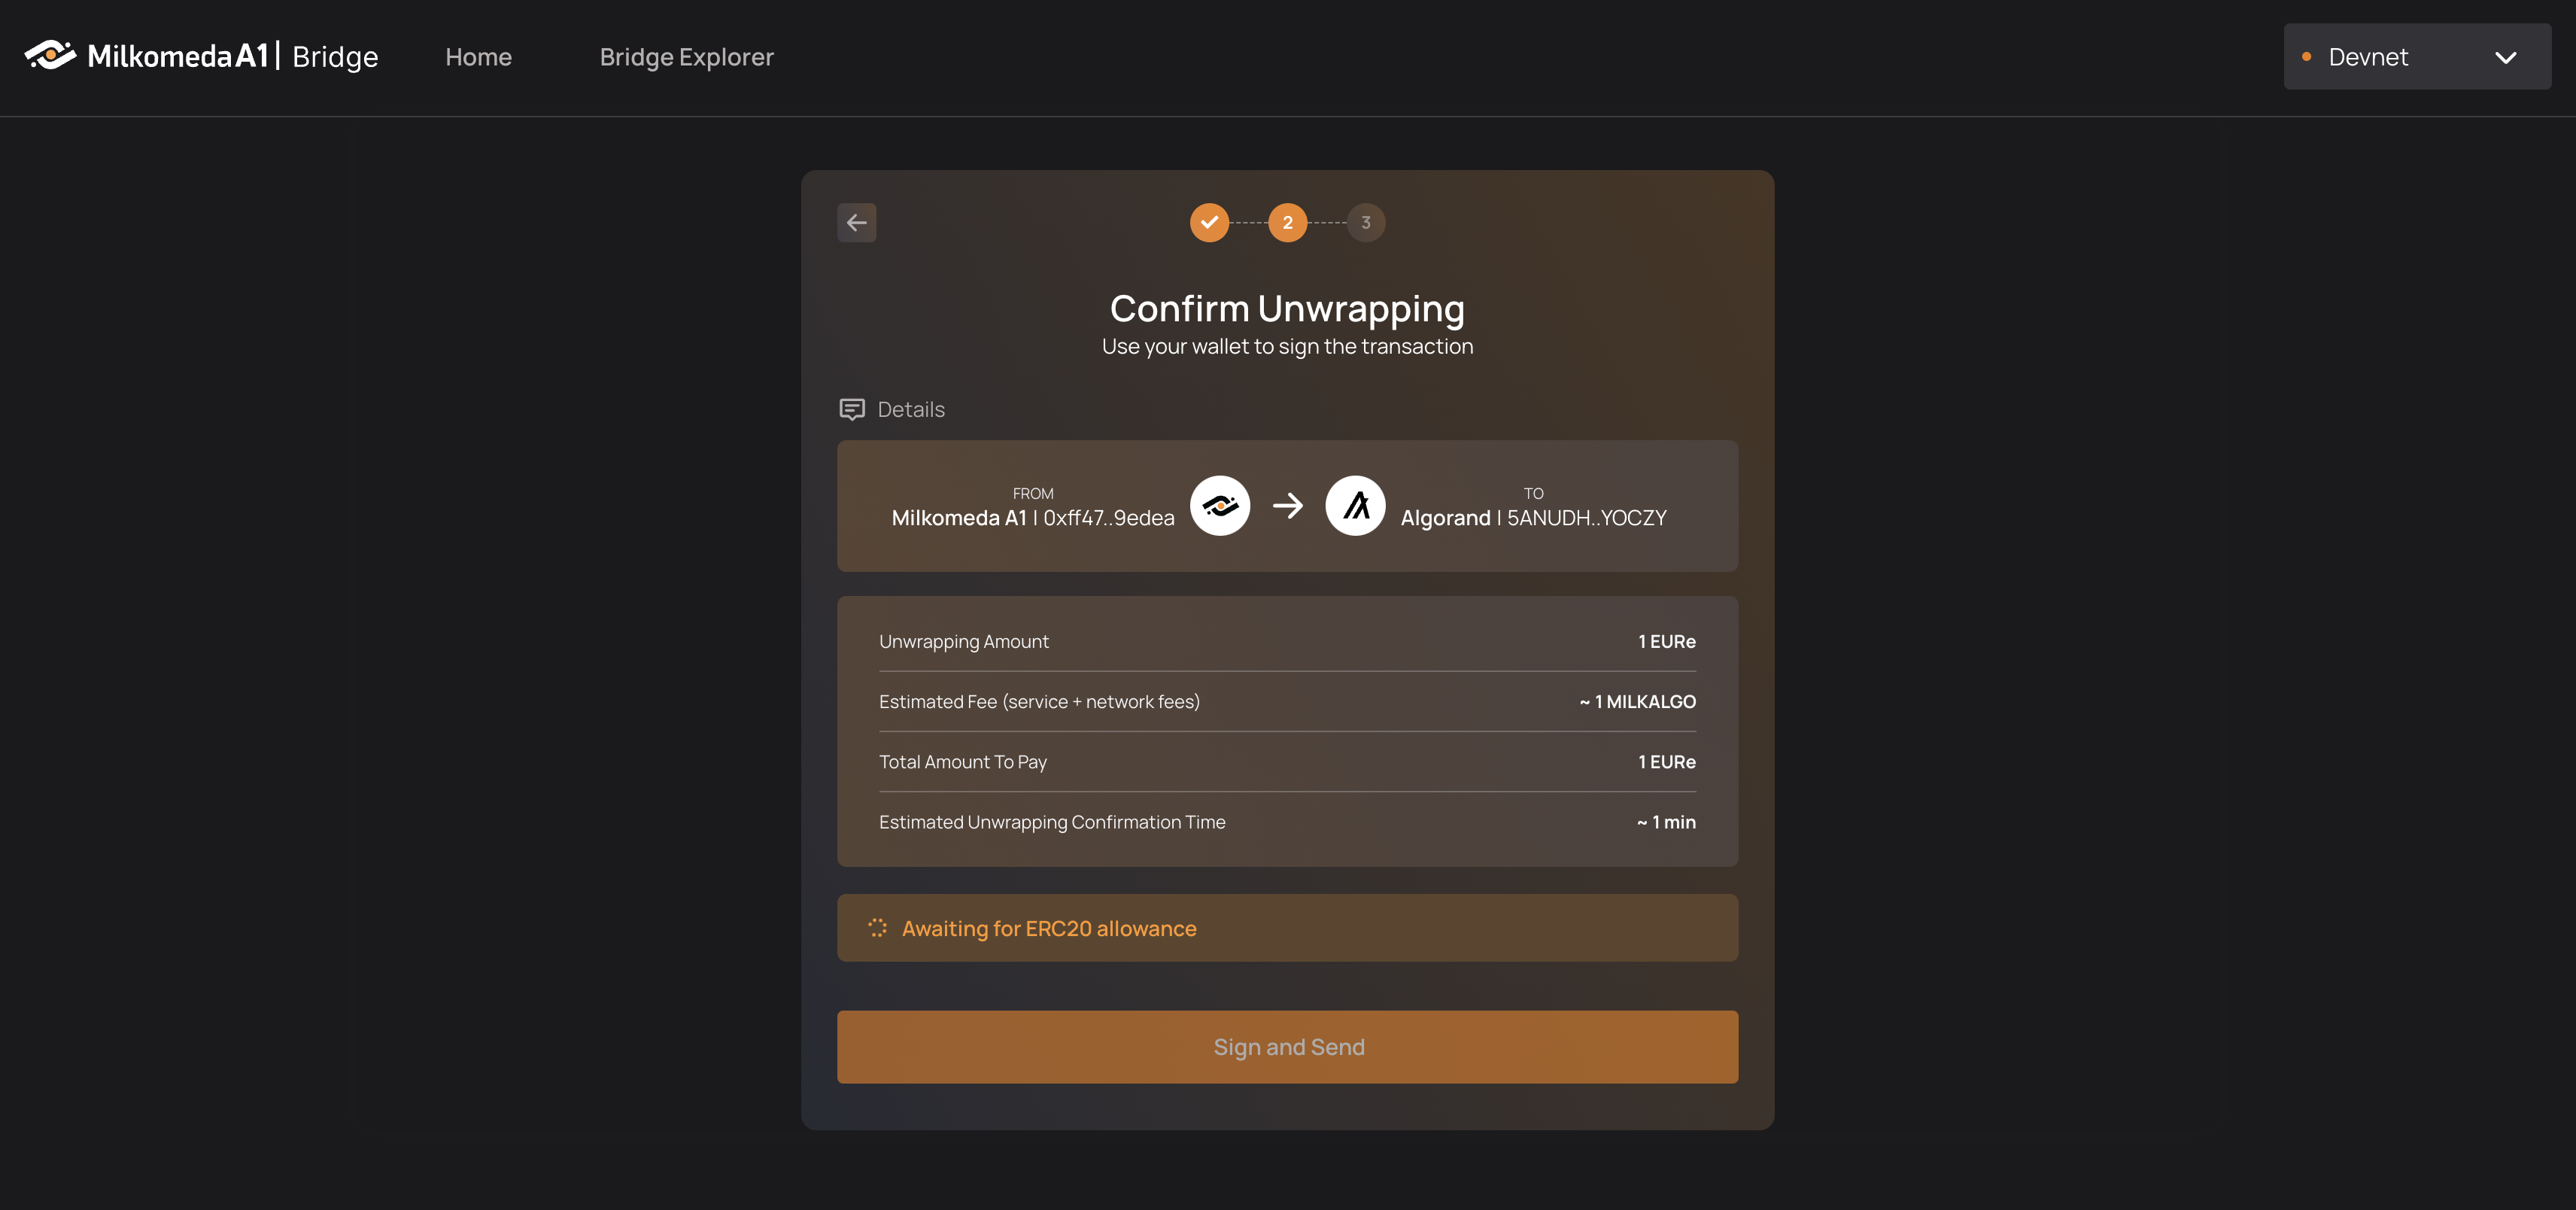
In our scenario we are approving the transfer of ERC20 tokens (e.g. EURe) by the Bridge contract. As a result, the contract is able to move the token from the user’s account on the EVM to the Bridge, where the unwrapping is performed.
Once the ERC20 allowance is approved, we can proceed to submitting an unwrapping request. MetaMask will pop up once again to ask for approval of the requested transaction.
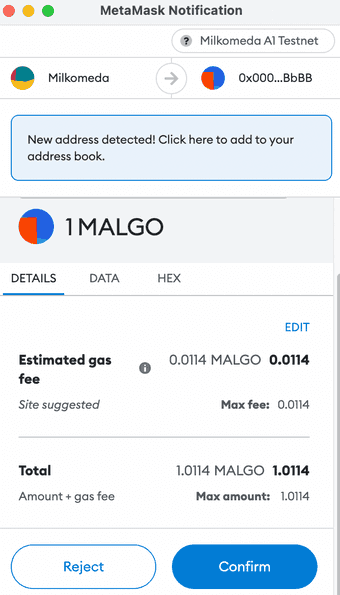
In the last step of the ASA unwrapping procedure a 1 MILKALGO unwrapping fee must be paid to the validators to process the unwrapping request.
Congratulations! You’ve just unwrapped your ASA from the Milkomeda Algorand Rollup back to the Algorand!
Algorand Bridge Supported ASA
This section presents all Algorand Standard Assets supported by the Milkomeda Bridge to Algorand. To wrap and unwrap any supported native asset follow the step-by-step tutorial presented in For End Users section by replacing milkAlgo with any token from the table below.
Please, remember that the specific native asset must be added to Milkomeda Token Registry before it can be used in any of the wrapping or unwrapping operations. Hence, the list is finite and allows only for specific native tokens.
If you want to see the latest list of tokens that can be wrapped/unwrapped by the Milkomed Bridge, visit our Bridge Explorer, where you can see all tokens (along with a button to help you add them to your Metamask)
List of supported Milkomeda A1 Assets:
| Token name | Token Ticker | Contract Address Details | Token Type |
|---|---|---|---|
| USDC | USDC | 0xBc31960A049Fe10297Ed8432Fb61DD734fEAd4ea | ERC-20 |
| USDt | USDt | 0x32564ae38E5DBf316958CE25A6aD2A2249EbCc2D | ERC-20 |
| goETH | goETH | 0x88168f58F783a23C163FD111DFE69E69BA2947B4 | ERC-20 |
| goBTC | goBTC | 0x36dbbC895B665B6Ad1C6fad28Ff012afaEb54E4C | ERC-20 |
| goMINT | goMINT | 0xE2Dbf4a7D95bd2Ec2f4b0A694C5E8f24B34Ac6D8 | ERC-20 |
| XET | XET | 0xcaDF2Ffd6D4FFDa791bF369cC750b5A52207026E | ERC-20 |
| Planets | Planets | 0xA516011CEEe9942be55BceE816922467f898F365 | ERC-20 |
| OPUL | OPUL | 0xaD0cE1898C9Ee566a501ED37DADBAc04d68C2C93 | ERC-20 |
| DEFLY | DEFLY | 0xebE505b49F458C6273c7768972D7C7DeE840ff73 | ERC-20 |
| YLDY | YLDY | 0x987c6054a745a95fe93047E2495584a72FcdCB9D | ERC-20 |
| STBL2 | STBL2 | 0x425E7EEF87e5401D6e0399A0D38b7593b4B2B7De | ERC-20 |
| ADAO | ADAO | 0xd645Fc6aC3757D2c7aA54dC4bbdEbF87ff3CDe3f | ERC-20 |
When using Milkomeda Algorand A1 Dapp for unwrapping a specific native asset, select it from the drop-down list as shown below:
Security
Milkomeda’s team treats network security with the utmost importance, making every effort to ensure that the key elements of the system are properly audited. Our team works with trusted and reputable blockchain auditing companies to report on the audit of Milkomeda’s smart contracts.
Laying down the road for an interoperable future
Implementing the core foundation for non-EVM ecosystems to experience the benefits of both rollups and Solidity.
Broader selection of dApps by allowing devs to port over existing projects from Ethereum.
Enables the latest innovations in ZK tech to be implemented as L3+ solutions on top of Milkomeda.

Built by developers, for developers
Deploy a Solidity (EVM) based smart contract in minutes.
All the tooling of Ethereum works out of the box.
Guides and examples are available to get you started building on Milkomeda.

Larger Talent Pool and Faster MVPs
Tap into the talent and resources of the largest community for smart contracts (Solidity) while building on chains like Cardano, Algorand and Solana.
Move faster and cheaper while still accessing tooling and expertise from core development to security auditing.

FOR DEVELOPERS
Build once, deploy everywhere
Thanks to Milkomeda, you can deploy your project - without changes - in most of the promising L1 blockchains.
Use all the tooling from EVM.
Building, deploying, debugging, and auditing all work the same way as in Ethereum.
Security consistency among deployments
Your multi-chain deployed code has the same security properties. No need to do individual audits per chain.
Start building right now
Milkomeda has its sidechain Cardano devnet and mainnet already working.
Follow our guide here
ROADMAP
BIG BANG
Q4 2021
Devops Validator Node Deployment
Multisig EVM Coordinator
Smart-Contract Updating Mechanism
Token Registry
(Cardano) Multi-Chain Syncer
(Cardano) Multisig Coordinator
(Cardano) Token Wrapping / Unwrapping
DARK AGES ERA
Q4 2021 - Q1 2022
(Cardano) Private Beta Mainnet
(Q4 2021)(Cardano) Limited Beta Mainnet
(Q1 2022)(Cardano) Public Beta Mainnet
(Q1 2022)
RADIATION ERA
Q2 2022 - Q3 2022
(Algorand) Rollup Testnet (Q2 2022)
Bridge Explorer
Acceleration Program & Hackathons
(Algorand) Beta Mainnet (Q3 2022)
Wrapped Smart-contracts
Portals Standard (TBD)
STELLIFEROUS ERA
Q4 2022 - Q1 2023
(Secret Chain C) Rollup Testnet (Q4 2022)
Interoperability (Q4 2022)
Governance (Q4 2022)
(Solana) Internal Testnet (2023)
(Solana) Rollup Testnet (2023)
(Solana) Beta Mainnet (2023)
(Secret Chain D) Validium Testnet (Q1 2023)

SUBSCRIBE FOR UPDATES
Subscribe and never miss the latest updates about Milkomeda.
We will share only the latest updates, processes, plans and insights.

